
Desserts
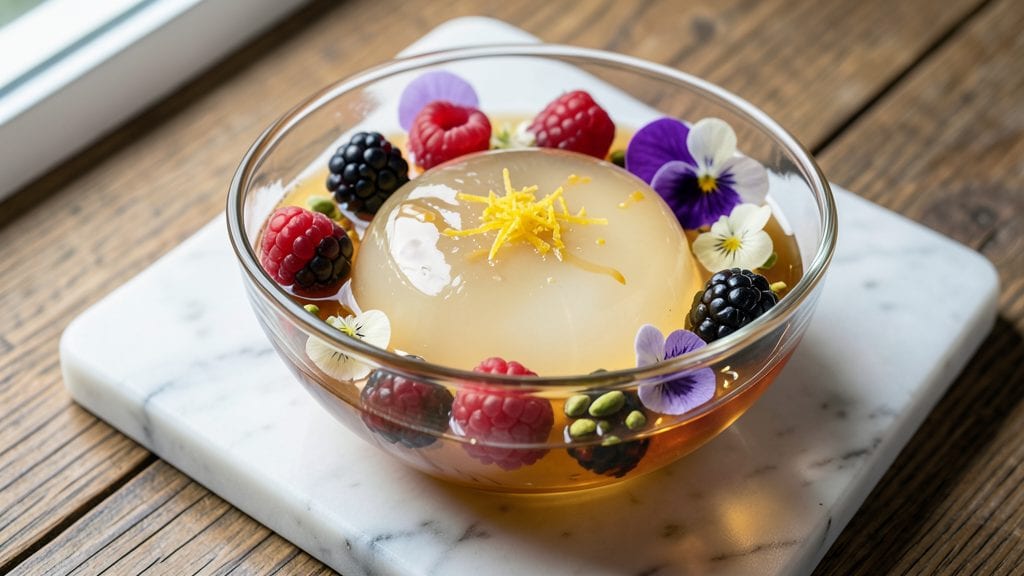
Creating an ice jelly recipe that wobbles like magic without a single bake is simpler than you think—and it only takes 10 minutes of active work. The secret lies in agar-agar, a plant-based gelatin substitute that transforms liquids into elegant, jiggly textures with just 5 minutes of boiling.
I’ve perfected this method for parties, summer gatherings, or even as a refreshing palate cleanser between courses.
What makes this recipe stand out is its no-bake approach and versatility—you can infuse it with fruit juices, herbal teas, or even coffee for endless flavor combinations. The agar-agar sets quickly when chilled, creating a light, translucent jelly that’s far more impressive than store-bought versions.
No special equipment is needed beyond a saucepan and molds, making it ideal for both beginners and experienced cooks.
The result is a crisp, wobbly dessert that’s cool, refreshing, and effortlessly elegant. Whether you serve it in individual cups as a dessert or as a decorative centerpiece, this jelly delivers restaurant-quality texture with minimal effort.
The best part? It stays fresh in the fridge for up to 5 days, so you can make it ahead and enjoy it all week.
For extra flair, garnish with fresh berries, mint leaves, or edible flowers—though the jelly itself is already stunning. Let’s get started on this foolproof, no-fuss dessert that’s perfect for any occasion.
Ingredients for ice jelly
Four servings of wobbly magic using just 11 ingredients—no baking, no fuss, all elegance.
| Ingredient | Amount | Notes |
|---|---|---|
| Agar-Agar Powder 🌿 | 1 ½ tsp | High-quality, powdered form |
| Water 💧 | 1 cup | Filtered preferred for clarity |
| Granulated Sugar 🍚 | ½ cup | White or organic cane sugar |
| Lemon Juice 🍋 | ¼ cup | Freshly squeezed, strained |
| Fresh Berries 🍓 | ½ cup | Raspberries or strawberries, chopped |
| Edible Flowers 🌸 | ¼ cup | Optional garnish, food-safe |
| Mint Leaves 🌿 | ¼ cup | Fresh, finely chopped |
| Vanilla Extract 🌸 | ½ tsp | Pure, high-quality extract |
| Honey 🍯 | 1 tbsp | Light or clover variety |
| Ice Cube Tray ❄️ | 1 whole | Or small ramekins for serving |
| Citric Acid 🍋 | ¼ tsp | Optional, enhances tartness |
Agar-agar is the star here, and Japanese brands like Maruzen or Suzuki are the gold standard—look for pure, powdered agar-agar, not the flake kind. The 1.5 teaspoons is precise: too little and it won’t set; too much and it’ll turn rubbery. I grab mine at Asian markets or online, but Whole Foods sometimes carries it too. The sugar isn’t just for sweetness—it helps the agar-agar gel properly. Organic cane sugar has a cleaner finish, but regular white works in a pinch.
No agar-agar? Kanten flakes (from the same brands) work at a 1:1 ratio, but you’ll need to bloom them in water first. Fresh lemon juice is non-negotiable for brightness—bottled juice lacks the vibrancy. Short on berries? Mango or passionfruit puree adds tropical flair. The honey and vanilla extract are optional but worth it for depth. If you’re making this ahead, store the liquid base in the fridge for up to 3 days before setting—it’ll just need a longer chill time.
This jelly sets in 2-3 hours in the fridge, but 4 hours ensures perfect wobble. Use clear glass molds for that restaurant-worthy look. Garnishes like edible flowers or mint can wait until serving—just press them in gently so they don’t float. Leftover jelly? It keeps for 5 days in the fridge, sealed tightly. For parties, make it the night before—it tastes even better after flavors meld.
Why You'll Love This Recipe
- No Boiling Fiasco: I swear by this recipe because it actually works—no overcooking, no burnt agar-agar mess. Just heat the water, stir in the powder, and let it simmer for three minutes. That’s it. No stress, no second-guessing.
- Tart-Sweet Magic: The lemon juice cuts through the sugar like a bright summer breeze, and those fresh berries? They add just enough pop to make it feel fancy without trying. Honestly, the first time I tasted it, I thought, "Why haven’t I been doing this all along?"
- Party in a Jar: This stuff is ridiculously easy to batch—make a big pot and portion it into small jars for picnics, potlucks, or even as a dessert for the kids’ lunchboxes. (Yes, even on a Tuesday night.) It stays crisp and cool for days, so you’re always prepared.
- Pantry Superstar: Agar-agar is cheap, lasts forever, and turns basic sugar and water into something special. No dairy, no fuss—just pure, refreshing texture. And because it sets so well, leftovers? Nonexistent. You’ll make just enough, eat it all, and still crave more.
Step-by-step instructions for ice jelly recipe
Here's how to transform simple ingredients into silky, wobbly ice jelly with no cooking required.
Bloom the Agar-Agar Powder
In a small saucepan, combine the 1 cup water with the 1.5 teaspoons agar-agar powder. I like to use a whisk to break up any clumps first—this ensures even distribution. Bring the mixture to a gentle boil over medium heat while stirring constantly. You'll see the agar-agar dissolve completely within 1-2 minutes.
Once dissolved, immediately remove the pan from heat. The agar-agar will begin thickening rapidly, so work quickly. Here's the thing—if you let it boil too vigorously, you'll get a slightly grainy texture. Keep the heat low enough to maintain gentle bubbling without boiling over.
Sweeten and Flavor the Base
While the agar mixture is still hot, whisk in the 0.5 cup granulated sugar until completely dissolved. This creates a smooth base for your jelly. Next, add the 0.25 cup lemon juice, 0.5 teaspoon vanilla extract, and 1 tablespoon honey, stirring well to combine. The mixture should be fragrant and smell intensely citrusy—this is your flavor foundation.
For that extra tang, sprinkle in the 0.25 teaspoon citric acid and stir until fully incorporated. This step is optional but makes a noticeable difference in brightness. Let the mixture cool to room temperature—it will begin thickening slightly as it sits. Patience here prevents graininess later.
Incorporate Fresh Elements
Once the base has cooled to about 100°F (just warm to the touch), it's time to fold in the fresh components. Gently stir in the 0.5 cup chopped fresh berries and 0.25 cup finely chopped mint leaves using a rubber spatula. Be careful not to crush the berries—you want them to remain intact for texture contrast. The mint will infuse subtle freshness that brightens the entire dessert.
For the final touch, lightly fold in the 0.25 cup edible flowers just before pouring. These delicate garnishes add visual appeal and a subtle floral note. Work quickly—agar sets faster as it cools. The mixture should have a thick, pudding-like consistency but still be pourable.
Pour and Freeze
Fill each compartment of the ice cube tray with the jelly mixture, filling to the top. Tap the tray gently on the counter to remove any air bubbles that might form. Place the tray in the freezer and let it set undisturbed for at least 4 hours, or until completely firm to the touch. You'll know it's ready when the jelly releases cleanly from the tray without any resistance.
Here's where the magic happens: the agar creates that signature wobble. When you gently press the jelly, it should hold its shape momentarily before returning to its original form. This texture is what makes ice jelly so uniquely satisfying—it's neither completely solid nor liquid, but something in between.
Serve and Enjoy
Pop the jelly cubes from the tray and serve immediately. The contrast of the cool, firm jelly against the room-temperature berries and mint creates an incredible sensory experience. Arrange them on a platter with additional mint leaves and edible flowers for an elegant presentation. This dessert is perfect for warm weather gatherings or as a refreshing palate cleanser between courses.
For best results, serve within 30 minutes of freezing. The jelly will begin to soften slightly at room temperature, but the texture remains delightfully wobbly. Store any leftovers in an airtight container in the freezer for up to 1 week, though I promise you won't have any leftovers!
Pro Tips For Making Ice Jelly
- Bloom the Agar: DESCRIPTION: Whisk the agar-agar powder into cold water first—all of it—before heating. I used to just sprinkle it in while boiling, and half the time it clumped like glue. Stirring it into room-temp water first guarantees even dissolving, so your jelly sets smooth instead of lumpy.
- Strain the Berries: DESCRIPTION: Mash your berries, then strain out the seeds through a fine-mesh sieve. Sounds tedious, but unfiltered pulp makes your jelly grainy and uneven. (Yes, even if you’re using strawberries—trust me, the texture’s worth it.)
- Boil Fast, Cool Faster: DESCRIPTION: Hit 100°C (212°F) in 2–3 minutes max—any longer, and the sugar burns. As soon as it’s boiling, remove from heat and let it sit for 1 minute before pouring. This stops the cooking process cleanly, so your jelly doesn’t turn cloudy or lose brightness.
- Pre-Chill the Molds: DESCRIPTION: Pop your molds in the freezer for 10 minutes before pouring the hot mix. The cold surface helps the jelly set faster and more evenly—no more wobbly centers or edges that stay liquid. (Pro move: Grease the molds first with a tiny bit of oil, too.)
Pro cooking tips for this dish
Agar-Agar Mastery
The key to perfect ice jelly lies in handling agar-agar powder correctly. First, whisk it into cold water to prevent clumping—this ensures even distribution. Bring to a gentle boil for exactly 1-2 minutes; overcooking turns it grainy.
I use Japanese-brand agar-agar (like Maruzen) because it dissolves smoother than generic substitutes. 🌡️
Pro tip: If your mixture thickens too fast, add 1 tablespoon water to adjust consistency. The goal is a smooth, pourable texture that still holds its shape when chilled. Never let it boil vigorously—this breaks down the agar fibers and ruins the wobble.
Temperature Control
Cooling the mixture to 100°F before adding fresh ingredients is non-negotiable. Use a thermometer if you're unsure—this prevents premature setting. I let mine sit at room temp for 10 minutes while stirring occasionally. The sugar helps stabilize the agar, but don't rush this step—patience prevents graininess.
For extra precision, place the saucepan in an ice bath while stirring continuously. This brings the temp down faster while maintaining control. The mixture should thicken slightly but remain spoonable—like thick pudding. If it sets too soon, gently reheat to 120°F to reset.
Flavor Layering
Add citric acid (if using) to hot liquid first—it dissolves completely and enhances tartness. Then fold in lemon juice, vanilla, and honey while the mixture is still warm.
This creates a flavor base that melds perfectly. For herbal notes, steep 1 teaspoon dried lavender in the hot agar mixture for 5 minutes before straining.
The berries and mint must go in last—when the base reaches 100°F. Use a rubber spatula to gently fold them in without crushing. This preserves their texture contrast against the jelly's smoothness. For tropical versions, replace berries with 1 cup mango puree and add ½ teaspoon lime zest.
Setting Secrets
Freezing time varies by mold size—ice cube trays require 4 hours, while ramekins need 6 hours. Tap the tray gently every 30 minutes to release air bubbles. The jelly should jiggle slightly when shaken but hold its shape when pressed firmly.
For restaurant-quality results, chill an additional 1 hour after freezing. This firms up the edges while keeping the center wobbly. I store extras in parchment-lined containers to prevent sticking. When reheating, microwave for 10 seconds on high—just enough to soften for serving.
Garnish Like a Pro
Edible flowers and mint should be added just before serving. Press them gently into the jelly's surface so they don't float. For a modern touch, dust with freeze-dried berry powder (available at specialty stores).
The contrast of vibrant garnishes against the translucent jelly makes it look like a professional dessert.
For a boozy twist, drizzle with 1 teaspoon elderflower liqueur or raspberry vodka** before serving. The alcohol prevents the jelly from softening too quickly. This technique works especially well for adult dessert parties where presentation matters as much as taste. ✨
Nutrition facts
Frequently asked questions
Can I make this ice jelly without agar-agar?
You can use kanten flakes (Japanese agar) at a 1:1 ratio, but the texture will differ slightly. For a gelatin alternative, try 1 tablespoon unflavored powdered gelatin dissolved in warm water, but the result will be less firm and more rubbery. Agar-agar creates that signature wobble—it’s the secret to restaurant-quality texture!
How do I prevent graininess in my jelly?
Graininess happens when agar-agar overheats or clumps. Always whisk the powder into cold water first, then bring to a gentle boil for just 1-2 minutes. Remove from heat immediately and let it cool slightly before adding sugar or flavors. Stirring constantly while heating keeps it smooth.
Can I make this jelly ahead of time?
Prepare the liquid base up to 3 days ahead and store it in the fridge. When ready to set, pour into molds and freeze for 4-6 hours. The flavors actually deepen over time, making it perfect for meal prep. Just add garnishes fresh before serving for the best presentation.
What’s the best way to unmold the jelly?
Run a thin knife around the edges of each mold to loosen the jelly, then dip the mold briefly in warm water for 5-10 seconds. This creates a slippery barrier that makes unmolding effortless. For ice cube trays, tap gently on the counter first to release air bubbles. Work quickly—agar jelly softens at room temperature!
Can I use this jelly for savory dishes?
While traditionally sweet, you can adapt this jelly for savory uses! Replace sugar with 1 tablespoon soy sauce or miso paste and infuse with herbs like dill or basil. Use it as a chilled appetizer with smoked salmon or as a palate cleanser between rich courses. The key is balancing flavors—start with half the sugar and adjust to taste.