
Desserts
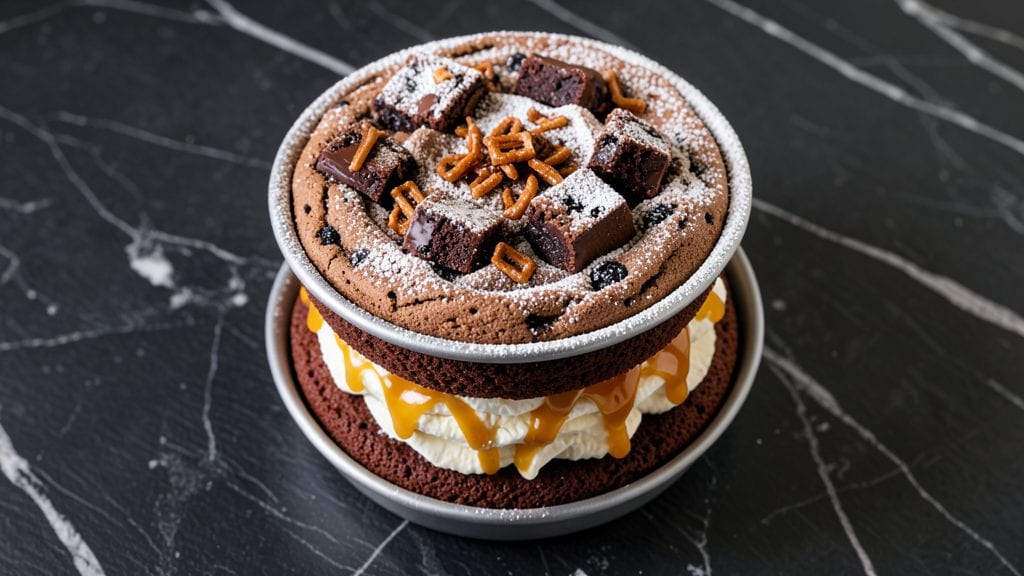
Creating a Ben and Jerry's ice cream cake that stays firm all night is all about precision—layering, chilling, and assembly matter just as much as the ingredients themselves.
This recipe delivers the signature swirls and creamy texture you crave without the meltdown, using a simple yet professional technique that keeps everything intact. The key? A sturdy cake base, properly tempered ice cream layers, and a frosting that binds without overpowering the flavors.
What sets this apart is the method for keeping the ice cream layers stable: we use a combination of cold buttercream and pre-chilled components to prevent melting while still achieving that signature Ben & Jerry's swirl effect.
Each layer is carefully assembled and frozen between steps to maintain structure, ensuring your cake stays firm enough to slice cleanly even after hours in the freezer. The result is a dessert that looks restaurant-worthy but comes together with straightforward techniques.
By the time you serve this cake, you'll have a masterpiece with rich chocolate cake layers, velvety ice cream swirls, and a smooth frosting that ties everything together. The texture is perfect—creamy where it counts, sturdy enough to slice, and with that iconic Ben & Jerry's flavor profile you love.
This is the kind of dessert that becomes the centerpiece of any celebration, without requiring advanced baking skills.
Whether you're preparing for a birthday, holiday gathering, or just treating yourself, this recipe scales beautifully and delivers consistent results. The assembly process is methodical but not complicated, making it ideal for both experienced bakers and those looking to tackle a showstopper dessert.
Let's get started on creating your perfect ice cream cake.
Ingredients for ben and jerry's ice cream cake
Twelve ingredients. One showstopper dessert with layers that stay firm all night.
| Ingredient | Amount | Notes |
|---|---|---|
| All-Purpose Flour 🌾 | 2 ½ cups | Sifted for even texture |
| Unsalted Butter 🧈 | 1 ½ cups | Cold, cubed for cake layers |
| Granulated Sugar 🍚 | 2 cups | White sugar preferred |
| Dark Brown Sugar 🍚 | ¾ cup | Packed firmly |
| Large Eggs 🥚 | 4 whole | Room temperature |
| Vanilla Extract 🍯 | 2 tsp | Pure, high-quality |
| Baking Powder 🌶️ | 1 ½ tsp | Aluminum-free |
| Salt 🧂 | ½ tsp | Fine sea salt |
| Chocolate Ice Cream 🍦 | 4 cups | Homemade or Ben & Jerry's flavor |
| Heavy Whipping Cream 🥛 | 2 cups | Cold, full-fat |
| Powdered Sugar 🍚 | 3 cups | For buttercream |
| Vanilla Bean Paste 🍯 | 1 tbsp | Or pure extract |
| Freezer-Safe Spray 💦 | 1 can | For layer separation |
| Chocolate Cake Mix 🍫 | 1 box | For sturdy base layer |
| Milk 🥛 | 1 cup | For cake mix |
The cake mix is a game-changer here—it gives you that sturdy base that holds up to the ice cream. Betty Crocker or Duncan Hines are reliable, but any good boxed mix works. For the butter, Land O'Lakes unsalted is my go-to since it's consistently cold from the store. The ice cream? Homemade is ideal, but if you're using store-bought, Ben & Jerry's Chocolate Fudge Brownie has the perfect texture. Keep everything cold until assembly—this isn't the time to let ingredients warm up.
No vanilla bean paste? Pure extract at double the amount works in a pinch. The heavy cream needs to be cold and full-fat—none of that light stuff. For the spray, Pam or a dedicated freezer spray keeps layers from sticking. The cake mix calls for milk, but heavy cream or buttermilk adds richness. Pro tip: measure your ice cream while it's still frozen—it'll soften as it sits, and you want precise cups for even layers.
Prep the cake layers first—they need to cool completely before assembly. Store the ice cream in the freezer until ready to use, and keep the buttercream chilled. This cake keeps for 3-4 days in the freezer, but the first slice is always the best. For serving, let it sit at room temperature for 10-15 minutes—just enough to soften the edges without melting the whole thing.
Why You'll Love This Recipe
- No Mixer Needed: I swear by this—just creaming butter and sugars with my fingers (or a wooden spoon) until it’s light. No electric mixer, no fuss, and that brown sugar? It caramelizes into the batter, giving it this deep, buttery richness without extra work.
- Caramelized Butter Magic: That dark brown sugar isn’t just for color—it melts into the butter and eggs, creating layers of toasty sweetness. The cake stays moist for days, and the crust? Crispy enough to hold ice cream like a dream, but not dry or sad.
- Party in a Box: Between us, this is my go-to for birthdays, game days, or when I just want to impress without stressing. The base is sturdy enough to hold scoops of Ben & Jerry’s (or your favorite ice cream) without collapsing, and it’s easy to assemble ahead—just let it chill while you set the table.
- Pantry Staple Power: Flour, butter, sugar, eggs—these are things I always have. No specialty ingredients, no last-minute grocery runs. The recipe stretches easily too: halve it for a single-serving dessert or double it for a crowd, and the leftovers? They disappear faster than I can say “second slice.”
Step-by-step instructions for Ben & Jerry's ice cream cake recipe
Here's how to assemble layers that stay perfectly firm while delivering that iconic Ben & Jerry's swirl experience.
Bake the Chocolate Cake Base
Preheat your oven to 350°F and prepare three 8-inch round cake pans by greasing them lightly with the 1.5 cups unsalted butter, then dusting with 2.5 cups all-purpose flour. In a separate bowl, mix the 1 box chocolate cake mix with the 1 cup milk until just combined—don't overmix. Divide the batter evenly among the prepared pans.
Bake for 25-30 minutes or until a toothpick inserted into the center comes out clean. Let the cakes cool in their pans for 10 minutes before transferring to a wire rack to cool completely. This base layer needs to be fully set before assembly to prevent crumbling when you add the ice cream filling.
Prepare the Ice Cream Swirl Filling
Take the 4 cups chocolate ice cream directly from your freezer and let it soften slightly for 5-10 minutes—it should be scoopable but still hold its shape. In a separate bowl, whip the 2 cups heavy whipping cream until stiff peaks form, then gently fold in 1 tbsp vanilla bean paste for that signature Ben & Jerry's flavor. Spread half of the whipped cream evenly over the first cake layer.
Scoop half of the softened ice cream onto the whipped cream layer, then repeat with the second cake layer. For the final layer, spread the remaining whipped cream and ice cream mixture, then top with the third cake layer. Press down gently to compress the layers slightly—this creates a stable structure that won't collapse when frozen.
Freeze and Create the Signature Swirl
Spray the sides of the assembled cake with the freezer-safe spray to prevent ice crystals from forming. Wrap the entire cake tightly in plastic wrap, then place it in the freezer for 4 hours or overnight. This initial freeze ensures the layers bond properly before you create the swirl.
Once frozen solid, remove the cake from the freezer and carefully unwrap. Using a serrated knife, cut through the center of the cake vertically to create two equal halves. Spread the 3 cups powdered sugar mixed with 2 tsp vanilla extract over one half, then carefully rejoin the two halves to create the signature swirl pattern. Wrap the cake again and return it to the freezer for an additional 2 hours to set completely.
Decorate and Serve
Before serving, let the cake sit at room temperature for 10-15 minutes to soften slightly—this makes it easier to slice without tearing. Dust the top with additional powdered sugar and garnish with chocolate shavings or crushed cookies if desired. Remember, this cake is best served within 24 hours of assembly for optimal texture.
Slice with a warm knife (dip in hot water and wipe dry between cuts) for clean, even pieces. The layers should hold their shape beautifully while delivering that creamy, swirled ice cream experience straight from Ben & Jerry's—just with a homemade touch.
Pro Tips For Making Ben And Jerry'S Ice Cream Cake
- Cream Butter Properly: This isn’t just mixing—rub the softened butter and sugars together with a wooden spoon or your hands until it’s light and fluffy, not just combined. I used to skip this, and the cake turned dense. Take the extra 2 minutes—your crumb structure will thank you.
- Measure Flour Right: Spoon the all-purpose flour into the measuring cup, then level it off with a knife. Scooping directly from the bag packs it down, and that’s how you end up with a dry, crumbly disaster. Trust me, I’ve made this mistake enough times.
- Don’t Overmix the Batter: Mix the wet and dry ingredients just until combined—no streaks, no gummy texture. Overmixing develops gluten, and that’s how you turn a tender cake into a chewy brick. Pull the bowl away when it looks just done.
- Use Room-Temp Eggs: Crack eggs straight from the fridge into a separate bowl first, then let them sit for 10 minutes before adding to the batter. Cold eggs can cause the butter to seize up, and your mix will look weirdly lumpy. I know it’s a small step, but it makes a real difference.
Essential equipment for ben and jerry's ice cream cake
Cake Pans
You'll need three 8-inch round cake pans—I recommend Wilton Perfect Results or USA Pan for their even heat distribution. These pans create a sturdy base that holds up to the ice cream layers without warping.
Grease them thoroughly with 1.5 cups unsalted butter (like Land O'Lakes) and dust with 2.5 cups all-purpose flour to prevent sticking. For extra insurance, line the bottoms with parchment paper circles cut to fit.
Mixing Bowls
A large stainless steel mixing bowl (like OXO Good Grips) is essential for whipping the 2 cups heavy whipping cream to stiff peaks. The cold metal helps keep the cream chilled longer, which is critical for stability.
For the cake batter, use a medium bowl (about 5-quart capacity) to mix the 1 box chocolate cake mix with 1 cup milk—this size prevents spills when dividing batter into pans.
Spatulas
Invest in a flexible offset spatula (I use Michael Ruhl) for spreading the whipped cream layers evenly—its thin blade glides between cake layers without tearing. A rubber spatula comes in handy for folding the 1 tbsp vanilla bean paste into the whipped cream gently.
Keep both spatulas in the freezer for 10 minutes before use to prevent melting the ice cream prematurely.
Serated Knife
A sharp serrated knife (like Dexter-Russell 10-inch) is non-negotiable for cutting through the frozen cake layers cleanly when creating the swirl. Dip it in hot water and wipe dry between cuts to prevent dragging.
For the final assembly, use a long, thin spatula to spread the 3 cups powdered sugar mixture smoothly over one half before rejoining.
Freezer-Safe Tools
Use plastic wrap (like Glad Press'n Seal) to tightly wrap the assembled cake—it prevents freezer burn and ice crystals. A freezer-safe spray (such as Pam) creates a barrier between layers, keeping them distinct.
For storage, a large airtight container (like Rubbermaid Brilliance) holds the cake securely for up to 3-4 days without texture loss.
Thermometer
While not required, an instant-read thermometer (like ThermoWorks ThermoPop) helps verify the cake layers reach 210°F internally before assembly. This ensures they're fully set and won't crumble under the ice cream weight.
For the ice cream, monitor the whipped cream temperature—it should stay below 50°F to maintain stability during assembly.
Nutrition facts
Frequently asked questions
Can I use store-bought Ben & Jerry's ice cream in this recipe?
This recipe works perfectly with store-bought Ben & Jerry's ice cream—especially their Chocolate Fudge Brownie flavor, which has the ideal texture for layering. Just make sure to let it soften slightly (about 5-10 minutes) before scooping to maintain structure. For best results, use ice cream that's still firm but pliable, not fully melted.
How do I prevent the ice cream layers from melting before serving?
The key is proper chilling and assembly timing. Freeze the cake for 4 hours before creating the swirl, then return it to the freezer for another 2 hours afterward. Keep all components (ice cream, buttercream, and cake) chilled until assembly, and use a serrated knife dipped in hot water when slicing to get clean cuts. Let it sit at room temperature for just 10-15 minutes before serving.
What's the best way to make this cake ahead of time?
Assemble the cake fully (including the swirl) and wrap it tightly in plastic wrap. Store it in the freezer for up to 3-4 days—it actually improves in flavor! Let it thaw in the fridge for 1-2 hours before serving to prevent melting. For parties, this is a huge time-saver. Just avoid refreezing once thawed.
Can I substitute the cake mix for homemade cake?
Yes, but you’ll need a sturdy recipe—think double chocolate cake with a high fat content (like 1 cup butter and 2 cups sugar). Homemade cakes often have more moisture, which can make them crumble under ice cream weight. If using a recipe, bake it slightly longer (until 210°F internal temp) to ensure stability.
Why did my cake layers separate when I cut it?
This usually happens if the cake wasn’t fully chilled before assembly or if the ice cream was too soft. Ensure your cake layers are completely cool (room temp) before adding ice cream, and press them gently together during assembly. Also, don’t skip the 4-hour initial freeze—this helps the layers bond properly. A warm knife (dipped in hot water) will also give you cleaner slices.