
Snacks
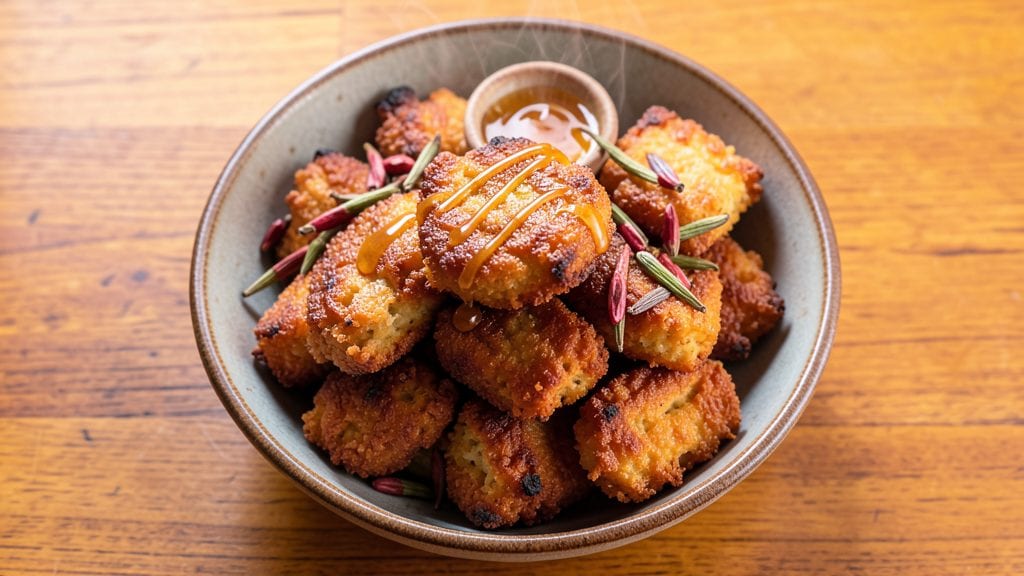
The African fried bread recipe I’m sharing delivers crispy, golden bites with a nutty depth that pairs perfectly with stews, tea, or honey. This recipe captures the essence of traditional mandazi or kenkey—simple yet deeply satisfying—while adapting to modern kitchens.
The secret lies in the fermentation process, which develops flavor and ensures a light, airy texture inside those crispy exteriors.
What makes this recipe stand out is its versatility. You can keep it classic with a touch of cinnamon or cardamom, or experiment with savory spices like garlic and curry powder for a completely different twist.
The dough requires just a few ingredients—flour, yeast, sugar, and a pinch of salt—making it accessible for any home cook. With the right technique, you’ll achieve that perfect balance of crispiness on the outside and softness within.
Once fried to a golden brown, these bread bites become irresistible—crunchy enough to satisfy, yet tender enough to melt in your mouth. The aroma alone will have everyone gathering around the kitchen, and the nutty, slightly sweet flavor makes them a hit at any meal.
Whether you’re serving them as a snack, breakfast, or dessert, they’re guaranteed to disappear quickly.
This recipe also works beautifully for meal prep or entertaining. Double the batch and keep them warm in the oven until ready to serve. Pair with your favorite African stew, chai tea, or even a drizzle of honey for a sweet treat.
Let’s get started on making these crispy, golden bites that taste like home.
Ingredients for african fried bread
Just 11 ingredients transform into golden, crispy African fried bread bites.
| Ingredient | Amount | Notes |
|---|---|---|
| All-Purpose Flour 🌾 | 3 cups | Sifted for light texture |
| Active Dry Yeast 🍞 | ¼ tsp | Ensure it's fresh |
| Granulated Sugar 🍚 | ¼ cup | White or brown |
| Unsalted Butter 🧈 | ½ cup | Softened, not melted |
| Milk 🥛 | ¾ cup | Warm, not hot |
| Large Egg 🥚 | 1 whole | Room temperature |
| Ground Cinnamon 🌿 | 1 tsp | Or cardamom for variation |
| Salt 🧂 | ½ tsp | Fine sea salt |
| Vegetable Oil 🫒 | 2 cups | For deep frying |
| Powdered Sugar 🍚 | ¼ cup | Optional for dusting |
| Honey 🍯 | ¼ cup | For dipping or drizzling |
The flour is the foundation—King Arthur or Gold Medal works best for that perfect light texture. Yeast needs to be fresh, so check the date on the package. Trader Joe's or Whole Foods usually have reliable stock. For the butter, don’t melt it—softened is key. If you’re short on time, microwave it for 20 seconds to just melt it, then let it cool. The milk should be warm but not hot—think lukewarm bathwater. And don’t skip the egg—it binds everything together for that crispy exterior. Cinnamon gives that classic nutty depth, but if you're feeling adventurous, swap it for cardamom or even a pinch of curry powder for a savory twist.
No cinnamon? Nutmeg or allspice works at half the amount. Out of powdered sugar? Regular sugar crushed in a food processor does the trick. The oil matters—vegetable or canola oil is best for frying, but peanut oil adds a nice flavor if you're going for a nutty profile. If you’re making a big batch, use a candy thermometer to keep the oil at 350°F—any hotter and they’ll burn before crisping. The honey is optional but adds that perfect finish—drizzle it right after frying while they’re still warm.
These stay crispy for about 2 hours if kept in an airtight container, but honestly, they disappear faster than that. For meal prep, fry half the batch, let them cool completely, then store in a sealed container for up to 3 days. Reheat in a 350°F oven for 5-10 minutes to restore that golden crunch. Freezing works too—just reheat from frozen for 10-12 minutes. Pro tip: double the batch and keep them warm in the oven at 200°F until ready to serve—perfect for parties or family gatherings.
Why You'll Love This Recipe
- No-Yeast Struggles Gone: I swear by this dough—no waiting for yeast to activate, no second-guessing if it’s risen enough. Just mix, let it sit for 20 minutes, and you’re golden. That sugar in the dough caramelizes just enough during frying to give it a subtle sweetness without tasting like dessert.
- Crispy-Outside, Soft-Center Magic: The butter-rich milk bath makes these golden and shatteringly crisp, while the inside stays pillowy. Honestly, the first time I bit into one still warm, I nearly dropped the whole batch. That’s the kind of reaction I live for.
- Breakfast, Snack, or Side: Serve it with jam for a lazy breakfast, tear into it with stew for a hearty lunch, or pack a batch in lunchboxes. My kids beg for it after school—no fancy plating, just pure, satisfying bread that works anywhere.
- Budget-Friendly Staple: Five ingredients, zero specialty items, and it stretches further than store-bought. I make a double batch, freeze half, and pull them out whenever I need a quick, filling boost. Leftovers? They disappear faster than I can reheat them.
Step-by-step instructions for African fried bread
Here's how to make those irresistibly crispy, golden bites with a nutty depth you'll crave.
Activate the Yeast for Perfect Rise
In a small bowl, combine the 0.75 cup warm milk (about 110°F) with the 0.25 cup granulated sugar and 0.25 tsp active dry yeast. Let it sit for 5-10 minutes until it becomes frothy. You'll see tiny bubbles forming—this means your yeast is alive and ready to work.
If it doesn't bubble after 10 minutes, your yeast might be old. Grab a fresh packet and start over. The yeast is the secret to that light, airy texture that makes these bread bites so satisfying. Once it's active, set the mixture aside while you prepare the rest of your ingredients.
Mix the Dough Until Smooth
In a large mixing bowl, whisk together the 3 cups all-purpose flour, 1 tsp ground cinnamon, and 0.5 tsp salt. Create a well in the center and pour in the yeast mixture, 0.5 cup softened butter, and 1 whole large egg. Using a wooden spoon, mix until a shaggy dough forms.
Once the dough starts coming together, switch to your hands and knead it on a lightly floured surface for about 5 minutes. You're looking for a smooth, elastic dough that springs back when poked. If it feels too sticky, add 1 tablespoon of flour at a time until it's just right. This kneading develops the gluten that gives your bread that perfect chewy texture.
Let the Dough Rest for Flavor Development
Place the dough back in your mixing bowl, cover it with a clean kitchen towel, and let it rest at room temperature for 1 hour. This resting period allows the gluten to relax and the flavors to meld together. I like to place my bowl in a slightly warm spot—like on top of the fridge—to help it rise just a little during this time.
After 1 hour, your dough should have roughly doubled in size. If it hasn't, give it another 30 minutes. Poke the dough gently—if it springs back slowly, it's ready. If it springs back quickly, let it rest a little longer. The goal is to have dough that's just firm enough to handle without being too sticky.
Shape and Fry to Crispy Perfection
Preheat 2 cups vegetable oil in a deep skillet or Dutch oven to 350°F. You'll want about 2 inches of oil—enough to fully submerge the bread pieces. While the oil heats, divide your dough into 4 equal pieces and roll each one out to about ¼-inch thickness. Cut each into 4 triangles (you should have 16 pieces total).
Carefully lower 4 pieces at a time into the hot oil using a slotted spoon. Fry for 2-3 minutes per side until they're deep golden brown and crispy. You'll smell that wonderful, nutty aroma—this is your signal that they're done. Transfer the fried pieces to a paper towel-lined plate to drain excess oil. Keep the oil at 350°F and fry the remaining pieces in batches.
Finish with Sweetness and Serve Warm
While the bread is still warm, mix together the 0.25 cup powdered sugar and 0.25 cup honey in a small bowl. Dip each piece of fried bread into this mixture or drizzle it on top. The contrast of the crispy exterior with the sweet glaze is what makes these bites so addictive.
Serve immediately while they're still warm and crispy. These bread bites are perfect for breakfast, as a snack with coffee, or even as a sweet treat with tea. Store any leftovers in an airtight container, but they won't last long—they're just too good to resist!
Pro Tips For Making African Fried Bread
- Test Yeast First: Mix a spoon of warm milk, a pinch of sugar, and your yeast into a small bowl—if it doesn’t foam in 5-10 minutes, toss it and start fresh. I learned this the hard way after baking a batch with dead yeast that left dough flat and dense.
- Butter the Pan Properly: Use a paper towel to smear 1-2 tablespoons of softened butter evenly across the pan—don’t just dot it. This guarantees crispy edges and prevents sticking, especially when frying multiple rounds. (Yes, even if you’re impatient like me.)
- Don’t Overcrowd the Pan: Fry bread in batches of 2-3 pieces, no matter how tempting it is to rush. Overcrowding steams the dough instead of frying it, leaving you with greasy, soggy bottoms instead of golden, shatteringly crisp crusts.
- Let Dough Rest Longer: Give the dough at least 1.5 hours to rise—double if your kitchen is chilly. Skimping here means uneven expansion, and those lumpy spots won’t fry evenly. (Your future self will thank you for the patience.)
Common mistakes when making great african fried bread
Overproofing the Dough
One of the most common mistakes is letting the dough rise too long, which causes it to collapse when fried. I’ve seen this happen when people leave the dough out overnight or forget about it. The ideal rise time is 1 hour at room temperature—any longer risks overproofing.
Look for dough that’s doubled in size but still springs back slowly when poked. If it springs back quickly, it’s underproofed; if it doesn’t spring back at all, it’s overproofed. 💡
Using Cold Ingredients
Cold butter or milk can shock the yeast and slow down fermentation, leading to a dense, flat bread instead of the light, airy texture you want. Always use warm milk (110°F) and softened butter (not melted).
I keep my butter at room temperature for 30 minutes before mixing, and I warm the milk in the microwave for 20 seconds, then let it cool slightly. Cold ingredients are a surefire way to ruin your dough’s structure.
Skipping the Resting Period
After kneading, many home cooks rush to shape the dough without letting it rest. This resting period (also called autolyse) relaxes the gluten, making it easier to handle and ensuring a better texture. If you skip it, your dough will be tough and difficult to roll out evenly.
Let the dough rest for 1 hour after kneading, covered with a towel. This simple step makes all the difference in the final crispiness and softness. ⏰
Frying at the Wrong Temperature
Frying at too low a temperature (325°F) will result in greasy, soggy bread, while frying too high (375°F) burns the outside before the inside cooks. The sweet spot is 350°F, maintained with a candy thermometer.
I use a deep skillet or Dutch oven with at least 2 inches of oil to ensure even cooking. If your oil isn’t hot enough, the bread will absorb too much oil and lose its crispiness.
Overcrowding the Fryer
Trying to fry too many pieces at once drops the oil temperature and makes the bread soggy. I fry in batches of 4 pieces to maintain the 350°F temperature. Overcrowding also makes it harder to turn the bread evenly, leading to uneven cooking.
Use a slotted spoon to carefully lower and remove pieces, and keep the oil hot between batches. Patience here ensures that perfect golden crust. 🔥
Ignoring the Honey Glaze
Many people skip the honey glaze, thinking the bread is already delicious on its own. While the fried bread is fantastic plain, the glaze adds that extra layer of sweetness and shine.
Dip the warm bread into the honey-sugar mixture or drizzle it on top—this step elevates the dish from good to unforgettable. The contrast of the crispy exterior with the sticky-sweet glaze is what makes these bites so addictive. 🍯
Nutrition facts
Frequently asked questions
What's the difference between mandazi and this African fried bread?
This recipe captures the essence of mandazi (East African fried dough) but with a slightly lighter texture. Traditional mandazi often includes more sugar and spices like cardamom, while this version balances sweetness with a crispier exterior. Both are delicious—it's really about personal preference and regional variations!
Can I make this dough ahead of time?
Shape the dough into triangles and refrigerate them (uncooked) for up to 24 hours. Let them sit at room temperature for 30 minutes before frying to bring back their springiness. This works perfectly for meal prep—just fry fresh when ready to serve.
What's the best oil for frying?
Vegetable or canola oil is ideal for frying these bites—neutral flavor and high smoke point (350°F). Peanut oil adds a subtle nutty depth if you're going for that flavor profile. Avoid olive oil (too low smoke point) and reuse the oil for up to 3 batches if properly strained.
How do I keep them crispy after frying?
Transfer fried pieces immediately to a wire rack (not paper towels) to let excess oil drip off. Store in an airtight container for up to 2 hours—any longer and they'll soften. For longer storage, freeze them and reheat in a 350°F oven for 5 minutes to restore crispness.
Can I make this recipe gluten-free?
Yes, but with adjustments! Swap the all-purpose flour for a 1:1 gluten-free flour blend (like Bob's Red Mill) and add 1 tsp xanthan gum to improve texture. You may need to reduce the milk slightly as gluten-free dough absorbs differently. The frying temperature remains the same (350°F).