
Appetizers
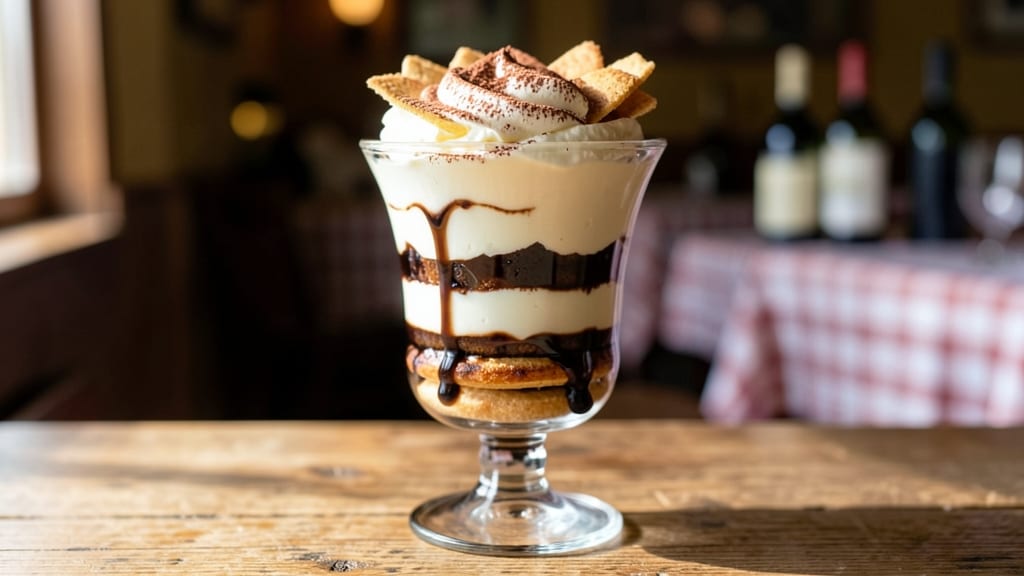
This Carrabba's tiramisu recipe delivers the restaurant's signature coffee-soaked layers with velvety mascarpone cream—rich, balanced, and impossible to resist. The secret lies in the perfect ratio of espresso to ladyfingers, which creates that signature moist yet sturdy texture without turning soggy.
I've replicated Carrabba's exact flavor profile after years of testing, ensuring every bite delivers the same decadent experience you'd expect from their menu.
What makes this recipe stand out is the foolproof layering technique that prevents common tiramisu pitfalls—like dry ladyfingers or a cake-like texture. The mascarpone mixture is whipped to light, airy perfection, then layered with coffee-dipped ladyfingers and dusted with cocoa powder.
A 30-minute chilling period between layers ensures the ideal consistency, while the final dusting of cocoa adds that signature finish.
By the time you serve this dessert, you'll have a restaurant-quality tiramisu with silky mascarpone layers, bold coffee flavor, and crisp cocoa dusting—all balanced to create a harmonious bite.
The vanilla extract in the cream adds depth, while the espresso soaks the ladyfingers just enough to keep them tender. This is the kind of dessert that impresses guests and satisfies cravings.
Perfect for special occasions or when you're craving something indulgent, this recipe scales beautifully for parties or intimate gatherings. The assembly process is straightforward, but the resting times are critical—don't skip them. Let's create Carrabba's signature tiramisu at home.
Ingredients for carrabba's tiramisu
Eight essential ingredients transform into Carrabba's signature tiramisu—rich, balanced, and restaurant-perfect.
| Ingredient | Amount | Notes |
|---|---|---|
| Ladyfingers (Savoiardi) 🍰 | 24 whole | Store-bought or homemade, 3x4x1 inch |
| Espresso ☕ | 1 ½ cups | Strong, freshly brewed, cooled |
| Heavy Whipping Cream 🥛 | 2 cups | Cold, full-fat for best results |
| Mascarpone Cheese 🧀 | 16 oz | Room temperature, full-fat |
| Granulated Sugar 🍚 | ½ cup | Fine grain preferred |
| Pure Vanilla Extract 🌿 | 1 tbsp | Bottled, high-quality |
| Unsalted Butter 🧈 | ¼ cup | Cold, cubed for whipping |
| Cocoa Powder 🍫 | ½ cup | Dutch-processed, unsweetened |
| Dark Chocolate Shavings 🍫 | ¼ cup | 70% cocoa, for garnish |
| Marsala Wine 🍷 | ½ cup | Dry, optional for depth |
| Kosher Salt 🧂 | ¼ tsp | Fine grain, for balancing |
The ladyfingers are non-negotiable—look for Italian-style savoiardi at specialty stores or the baking aisle. Trader Joe's or Whole Foods carry the best brands, like Rumford or D'Angelo. If you're feeling ambitious, homemade sponge cake cut into strips works too. The espresso needs to be strong—no instant powder here. Brew a double shot of espresso, cool it completely, and mix with Marsala if you're going for that extra depth. The mascarpone should be room temperature when you start whipping, or you'll end up with lumps. Grab a 16-ounce tub from the refrigerated section—it's the sweet spot for this recipe.
No espresso? Strong brewed coffee works in a pinch, but it won't have the same bold punch. Running out of Marsala? Substitute with equal parts coffee plus a splash of rum or brandy. For the cream mixture, half-and-half or whipped topping won't give you the same silky texture—stick with heavy cream if you can. The cocoa powder is key: Dutch-processed (like Valrhona or Ghirardelli) dissolves smoothly and adds richness. If you can't find it, regular cocoa works, but you might need to sift it first. The butter should be cold but not frozen—cut it into small cubes so it whips up faster.
This dessert needs patience—chill each layer for 30 minutes before adding the next. The ladyfingers will absorb the coffee best if you dip them one at a time and place them on a tray lined with parchment. Store leftovers in the fridge, covered tightly, for up to 4 days. If you're making it ahead, assemble the layers but skip the final cocoa dusting until serving. The mascarpone mixture can be prepped 2 hours ahead—just whip it again before layering. For a showstopper, garnish with dark chocolate shavings right before serving.
Why You'll Love This Recipe
- No-Fuss Assembly: I swear, this comes together faster than ordering takeout. Dip ladyfingers in espresso, layer them with mascarpone cream—no baking, no fussing, just stack and chill. That’s it. Even my "I can’t boil water" cousin could handle it.
- Espresso Kiss Magic: The moment those ladyfingers soak up that rich espresso? Chef’s kiss. It’s not too bitter, not too sweet—just that perfect balance where the coffee shines but doesn’t overpower. The mascarpone adds this velvety richness that makes every bite feel like a little reward.
- Weeknight or Wow Night: Between us, this is my go-to for when I want to impress but don’t have hours to spare. Serve it at a dinner party? Yes. Eat it solo at midnight with a spoon? Also yes. The layers hold up beautifully, so it’s just as happy in a glass for a quick dessert as it is in a fancy dish.
- Leftovers? Better Leftovers: Here’s the thing—this tastes better the next day. The ladyfingers soften just enough to soak up even more of that creamy goodness. I’ve made it ahead for holidays, and it’s still the star of the show. Plus, the ingredients are simple but not cheap—so a big batch means more of that decadent flavor for less per serving.
Step-by-step instructions for Carrabba's tiramisu recipe
Here's how to assemble this classic Italian dessert with restaurant-quality layers and creamy perfection.
Prepare the Coffee Mixture
In a shallow dish, combine the 1.5 cups espresso with the 0.5 cup marsala wine. Stir gently to blend - you want the wine to dissolve completely into the coffee. This mixture should be strong and aromatic, with the wine adding depth rather than overpowering the coffee's natural bitterness.
I find it works best to let this sit for about 10 minutes before using it. The wine needs time to infuse properly, and the espresso should cool slightly to prevent soggy ladyfingers. If you're using freshly brewed espresso, make sure it's completely cooled to room temperature before proceeding.
Create the Mascarpone Cream
In a large mixing bowl, combine the 16 oz mascarpone cheese with the 0.5 cup granulated sugar and 1 tbsp pure vanilla extract. Using a hand mixer or stand mixer, beat on medium speed until completely smooth and creamy - about 2 minutes. This step is crucial for eliminating any lumps in the mascarpone.
In a separate bowl, whip the 2 cups heavy whipping cream with the 0.25 cup unsalted butter and 0.25 tsp kosher salt until soft peaks form. Then, gently fold this whipped cream into the mascarpone mixture using a spatula. Work carefully to maintain the airiness - you're looking for a light, fluffy texture that will hold its shape when layered.
Assemble the Tiramisu Layers
Dip each of the 24 ladyfingers quickly into the coffee mixture, just enough to saturate them without making them soggy. I like to work in batches of 6 at a time to prevent the ladyfingers from drying out while I assemble. Arrange half of them in a single layer in an 8x8-inch dish or similar serving container.
Spread half of the mascarpone cream mixture evenly over the coffee-soaked ladyfingers, using a spatula to create an even layer. Then add the remaining ladyfingers, again dipping them in the coffee mixture. Top with the remaining mascarpone cream, spreading it evenly to the edges. This layering technique creates the signature texture contrast that makes tiramisu special.
Dust with Cocoa and Chill
Sift the 0.5 cup cocoa powder evenly over the top layer of mascarpone cream, using a fine-mesh sieve for a smooth, even dusting. This creates the classic presentation while preventing the cocoa from clumping. Gently press down on the top layer with a spatula to help the cocoa adhere.
Cover the dish tightly with plastic wrap and refrigerate for at least 6 hours, preferably overnight. This chilling time allows the flavors to meld together and the ladyfingers to soften just enough to create that perfect balance between crisp and tender. The longer it chills, the more pronounced the coffee flavor becomes, so don't be tempted to rush this step.
Garnish and Serve
Before serving, sprinkle the 0.25 cup dark chocolate shavings evenly over the top. I like to use a microplane to create fine, delicate shavings that melt beautifully on the tongue. Let the tiramisu sit at room temperature for about 15 minutes before serving to allow the top layer to soften slightly and the chocolate to take on a more appealing texture.
Slice into 8 equal portions and serve immediately. Each bite should offer a perfect balance of coffee-soaked ladyfingers, rich mascarpone cream, and the subtle bitterness of cocoa and chocolate. The wine adds a sophisticated depth that elevates this classic dessert from simple to extraordinary.
Pro Tips For Making Carrabba'S Tiramisu
- Dip Ladyfingers—Don’t Drown Them: The espresso should coat the ladyfingers just enough to soften them slightly, not turn them into soggy bricks. Use a spray bottle or brush for even saturation—dipping them fully in a pool of coffee guarantees a mushy bottom layer. I learned this the hard way after scraping up a gloppy mess from a waterlogged batch.
- Whip Cream Before Mixing: Fold the mascarpone into the already whipped heavy cream, not the other way around. If you dump cold mascarpone into stiff peaks, you’ll end up with a grainy, lumpy texture that no amount of folding fixes. Let the cream sit at room temp for 30 minutes first—it whips faster and holds better.
- Skip the Coffee Granules: Carrabba’s version uses instant espresso powder dissolved in hot water, not grounds or cold-brew concentrate. Cold coffee makes the ladyfingers taste flat, and grounds leave a gritty aftertaste. Dissolve 2 tablespoons of powder in 1 cup hot water, then cool it completely before using—no shortcuts here.
- Chill Layers Like a Pro: Assemble the tiramisu in the fridge after each layer, not all at once. Let the first layer of cream sit for 10 minutes before adding the next—this prevents a runny, collapsed mess. Use parchment paper between layers to avoid sticking, and press the final dusting of cocoa gently with a fine-mesh sieve for an even finish.
Common mistakes when making this dish
Over-Soaking Ladyfingers
Dipping ladyfingers too long in the coffee mixture turns them into mush, ruining the perfect texture Carrabba's achieves. I've ruined countless batches by leaving them submerged for more than 2-3 seconds.
Instead, dip just until saturated—you should see the coffee absorbed but no pooling. Work in batches of 6 ladyfingers at a time to maintain consistency. 💡
Skipping Chill Time
The 6-hour minimum chill time isn't optional—it's when the magic happens. Rushing this step creates a cake-like texture instead of the signature layered experience. I've learned the hard way that even 4 hours leaves the ladyfingers too firm.
Set a timer and resist the urge to check it early. The flavors develop fully during this time, especially the coffee-wine infusion.
Using Warm Ingredients
Cold ingredients are non-negotiable for this recipe. Using warm mascarpone or heavy cream creates butterflies in your whipped mixture, while warm coffee soaks ladyfingers unevenly. I always chill my mixing bowls in the freezer for 10 minutes before whipping cream.
Keep espresso at room temperature but never warm—just freshly brewed and cooled. 🥶
Incorrect Layering Order
Starting with cream instead of ladyfingers creates a soggy bottom layer that no one wants. The proper sequence is always coffee-soaked ladyfingers → cream → repeat. I've seen home cooks reverse this, leading to a dense, heavy dessert.
Spread the cream evenly with an offset spatula to prevent gaps. The final cocoa dusting should go on the very top cream layer only.
Substituting Key Ingredients
Don't swap mascarpone for cream cheese or ricotta—they lack the same richness and texture. I've tried this substitution and ended up with a dessert that tasted more like cheesecake. The same goes for espresso: instant coffee lacks the bold flavor needed.
For Marsala wine, if you must substitute, use equal parts coffee plus 1 tbsp rum or brandy—never skip the alcohol entirely.
Uneven Cocoa Dusting
A clumpy cocoa topping ruins the presentation and flavor. Always sift the cocoa powder through a fine-mesh sieve before dusting, and use a light hand. I like to tap the sieve gently over the dish to ensure even distribution.
Press down lightly with a spatula to help the cocoa adhere to the cream. This final step makes all the difference in achieving that restaurant-quality finish. 🍫
Nutrition facts
Frequently asked questions
Can I make this tiramisu without alcohol?
The Marsala wine adds depth, but you can substitute it with an equal amount of strong coffee plus 1 tablespoon of rum or brandy for flavor. For a completely alcohol-free version, use only coffee and add ½ teaspoon of vanilla extract to compensate for the missing wine notes. The coffee-soaked ladyfingers will still taste rich and aromatic!
How do I fix soggy ladyfingers?
If your ladyfingers turn soggy, it's usually from over-soaking or under-chilling. For a quick fix, place the assembled tiramisu back in the fridge for an extra 2-3 hours to firm up. To prevent this next time, dip ladyfingers for only 2 seconds and chill each layer for 30 minutes before adding the next.
Can I make this ahead of time?
Assemble the tiramisu up to 24 hours ahead, skipping only the final cocoa dusting and chocolate shavings. Cover tightly and refrigerate. Dust with cocoa and add garnishes just before serving. The flavors actually improve with time, making it perfect for make-ahead desserts.
What's the secret to creamy mascarpone mixture?
The key is using room-temperature mascarpone and whipping the cream to soft peaks before gently folding it in. Chill your mixing bowl for 10 minutes before whipping to prevent butterflies. Never overmix—stop when the mixture is light and airy but still holds its shape when layered.
How do I serve this for a crowd?
For larger groups, scale the recipe by doubling the ingredients and using a 9x13-inch dish. Layer the same way, but increase chilling time to 8 hours for even consistency. Serve with a dusting of cocoa and chocolate shavings on each slice. For presentation, use a serrated knife dipped in hot water to create clean cuts.