
Appetizers
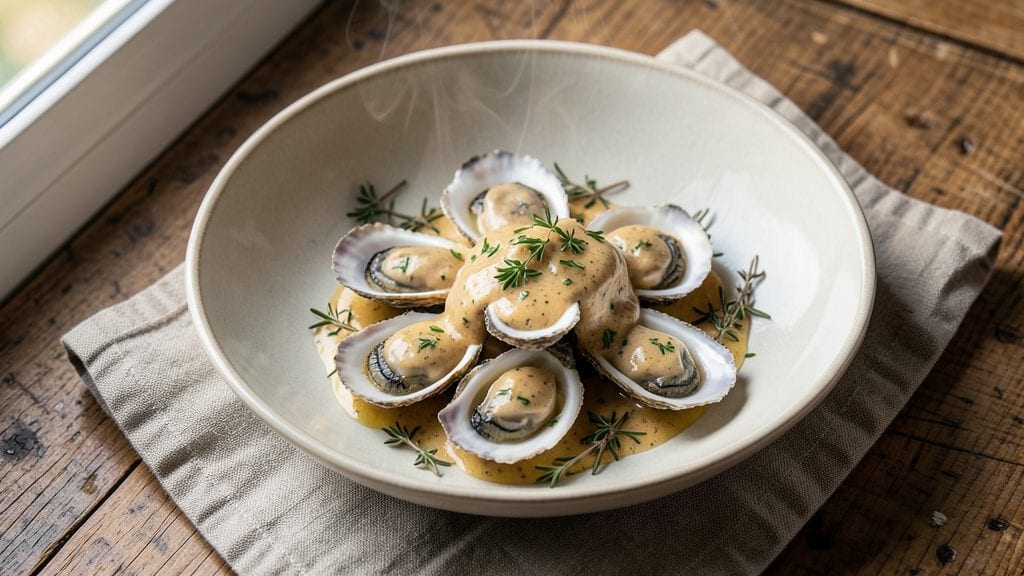
A cooked oysters recipe with garlic-herb butter turns raw shellfish into a luxurious bistro-style appetizer that’s surprisingly simple to master. The key lies in proper preparation—brining the oysters briefly to enhance their natural sweetness while ensuring they cook evenly in the oven.
I’ve perfected this method over years of hosting dinner parties, where these golden, buttery bites become the star of the table.
This recipe delivers restaurant-quality results with just five key ingredients: fresh oysters, garlic-herb butter, lemon, white wine (or broth), and a touch of parsley. The baking method creates tender yet crisp edges, while the garlic-herb butter infuses rich, savory depth.
Unlike quick searing, which risks drying out the oysters, baking ensures consistent doneness—every oyster opens perfectly, revealing plump, juicy meat.
The final presentation is what elevates this dish from appetizer to showstopper: oysters nestled in their shells, crowned with a dollop of melted garlic butter and a squeeze of lemon. Serve with toasted baguette slices to soak up every last bit of that aromatic, buttery sauce.
This is the kind of dish that makes guests believe you’ve spent hours in the kitchen—when in reality, it’s a 30-minute transformation.
For those new to cooking oysters, I’ve included a foolproof brining technique and safety tips to ensure success. The same method works for grilled or broiled oysters, so feel free to adapt based on your preferred cooking style.
Whether you’re prepping for a dinner party or treating yourself to a seafood night in, this recipe delivers professional results with minimal effort.
Ingredients for cooked oysters
Five ingredients transform raw oysters into luxurious, restaurant-style appetizers with golden garlic butter.
| Ingredient | Amount | Notes |
|---|---|---|
| Fresh Oysters 🦪 | 24 whole | Shucked in shells, same size |
| Unsalted Butter 🧈 | ½ cup | Cold, cut into small cubes |
| Garlic Cloves 🧄 | 6 cloves | Fresh, minced finely |
| Fresh Parsley 🌿 | ¼ cup | Chopped finely, stems removed |
| Dried Thyme 🌿 | 1 tsp | Or 1 tbsp fresh thyme |
| Dry White Wine 🍷 | ½ cup | Sauvignon Blanc or Pinot Grigio |
| Lemon Juice 🍋 | 2 tbsp | Freshly squeezed |
| Sea Salt 🧂 | 1 tsp | Fine grain, for brining |
| Black Pepper 🌶️ | ¼ tsp | Freshly cracked |
| Baguette Slices 🍞 | 8 pieces | Thinly sliced, for serving |
| Chicken Broth 💧 | ½ cup | Substitute for wine if needed |
The oysters are the foundation, so source them from a trusted seafood market—look for plump shells with tightly closed valves. Whole Foods or local fishmongers often carry the freshest selection, and always ask when they were harvested. For brining, use ice-cold water and sea salt—never table salt, as it contains anti-caking agents that can alter flavor. The butter should be cold and cubed to create a rich, compound butter that melts beautifully during baking. If you're short on time, pre-minced garlic works, but fresh is always better.
No white wine? Chicken broth with a splash of lemon juice mimics the acidity and depth perfectly. Fresh parsley is ideal, but dried parsley at half the amount works in a pinch. For the thyme, fresh sprigs can be used whole and removed before serving. If you're serving a crowd, double the oysters—they disappear fast! The baguette should be toasted until crisp; garlic-infused oil for brushing adds another layer of flavor. For extra richness, add a pinch of smoked paprika to the butter mixture.
Shuck the oysters immediately before baking to preserve their freshness. Store any unshucked oysters in the original container on ice for up to 2 days. The garlic-herb butter can be prepped 1 day ahead and stored in the fridge, wrapped tightly in plastic. Once baked, oysters are best served immediately, but leftovers can be reheated gently in the oven for 3-4 minutes. The baguette stays crisp for 2 hours if stored in an airtight container.
Why You'll Love This Recipe
- Five-Ingredient Magic: I swear by this—just oysters, butter, garlic, parsley, and thyme. That’s it. No fancy gadgets, no stress, and honestly? The hardest part is shucking them (and I’ve gotten faster with practice).
- Butter-Garlic Bliss: The moment the butter melts into those briny oysters with minced garlic? Pure satisfaction. That crispy edge on the edges, the creamy center—it’s the kind of flavor that makes you pause mid-bite.
- Weeknight or Dinner Party: Between us, this works for both. Serve it steaming on a tray with crusty bread for a lazy Tuesday, or plate it elegantly with lemon wedges for guests. Same recipe, two vibes.
- Leftovers? No Problem: Cooked oysters don’t last long, but if you do have extras, they’re perfect cold in salads or on toast the next day. (Yes, even on a Tuesday.) No waste, just flavor.
Step-by-step instructions for baked bistro-style oysters
This method delivers perfectly cooked oysters with tender meat and rich garlic-herb butter.
Prepare the Garlic-Herb Butter
In a medium bowl, combine the 0.5 cup unsalted butter, 6 cloves minced garlic, 0.25 cup chopped parsley, 1 teaspoon dried thyme, 0.25 teaspoon black pepper, and 1 teaspoon sea salt. Mix thoroughly with a fork until the butter is fully incorporated and the mixture resembles coarse sand. This ensures even flavor distribution throughout the butter.
Transfer the mixture to a small baking dish and refrigerate while you prepare the oysters. The cold butter will help maintain its shape when baking, preventing it from melting prematurely. This step is crucial for achieving that signature bistro-style flavor in every bite.
Shuck and Arrange the Oysters
Carefully shuck the 24 whole fresh oysters, leaving them in their shells. Discard any oysters that are open and don't close when tapped gently. Arrange the oysters in a single layer in a large baking dish, with the flat side down. This positioning ensures even cooking and prevents the oysters from curling up during baking.
Drizzle each oyster with 1 tablespoon of the lemon juice. The acidity helps tenderize the meat slightly and balances the richness of the butter. Cover the baking dish loosely with aluminum foil and refrigerate for 15 minutes. This brief brining step enhances the oysters' natural flavors and prepares them for optimal cooking.
Bake the Oysters to Perfection
Preheat your oven to 425°F. Remove the oysters from the refrigerator and arrange them on a baking sheet lined with parchment paper. Top each oyster with a small pat of the garlic-herb butter mixture, pressing down gently to ensure contact with the oyster meat. Bake for 8-10 minutes until the butter is golden brown and bubbling.
Watch the oysters closely during the last 2 minutes of baking. They're done when the edges of the butter turn golden brown and the oysters begin to curl slightly at the edges. The internal temperature should reach 145°F. Overcooking will make the oysters tough, so timing is critical. Remove from the oven immediately when they're done.
Prepare the Wine Sauce
While the oysters bake, heat the 0.5 cup dry white wine in a small saucepan over medium heat. Add the 0.5 cup chicken broth and bring to a gentle simmer. Reduce the heat to low and let it simmer for 5-7 minutes until the liquid reduces by about half and coats the back of a spoon. This reduction intensifies the wine's flavor, creating a rich sauce to complement the oysters.
Strain the sauce through a fine-mesh sieve into a small bowl to remove any impurities. Keep the sauce warm until ready to serve. The sauce should have a velvety consistency and a pleasant aroma of wine and herbs. If the sauce thickens too much while waiting, whisk in a small amount of hot water to reach your desired consistency.
Serve with Baguette
Arrange the baked oysters on a serving platter, spooning any remaining garlic-herb butter over the top. Serve immediately with the reduced wine sauce drizzled alongside. Toast the 8 pieces baguette slices lightly and serve on the side for dipping.
Each oyster should have a tender, slightly curvy appearance with golden-brown butter on top. The meat should be opaque and just beginning to pull away from the shell slightly. Serve with the wine sauce immediately, as the flavors are at their peak when everything is hot. Enjoy with a crisp white wine to complement the dish.
Pro Tips For Making Cooked Oysters
- Shuck Over Ice: Fresh oysters open easier when chilled—place them shell-side down on a bed of crushed ice for 10 minutes before shucking. The cold tightens the muscle, making the knife slip in cleaner and reducing the risk of slicing through the tender meat. (Yes, even if you’re impatient like me.)
- Melt Butter Slow: Start with cold butter and let it melt gradually over medium-low heat—no splattering, no rushing. If you dump in melted butter straight from the fridge, you’ll scramble the oysters before they even get a chance to sing. Think "gentle pool of gold," not "butter volcano."
- Garlic First, Then Oysters: Sauté the minced garlic in the pan until it’s just fragrant, not browned—about 30 seconds. Add the oysters immediately after removing the garlic, so they cook in that warm, aromatic butter, not in a pan that’s already lost its punch. (Your nose will thank you.)
- Parsley at the End: Toss in the parsley after the oysters are done and the pan’s off the heat—it wilts instantly and brightens the dish without turning to mush. If you add it earlier, you’re just making a sad, limp garnish. (And no one wants that.)
Make-ahead tips for cooked oysters
Prep Ahead Butter
The garlic-herb butter can be made 24 hours ahead and stored in an airtight container in the fridge. I like to wrap it tightly in plastic wrap to prevent absorbing fridge odors.
When ready to use, let it sit at room temperature for 10-15 minutes before baking—this ensures it melts beautifully over the oysters. For extra convenience, portion the butter into small patties using a 1-teaspoon cookie scoop so you can quickly top each oyster during baking. 🧈
Brined Oyster Prep
Shuck the oysters and arrange them in a single layer on a tray. Place the tray in the fridge uncovered for 1 hour before baking to let any excess moisture evaporate. This step prevents soggy butter during baking.
I also recommend placing a small bowl of baking soda in the fridge with the oysters to neutralize any fishy odors. The brining step in the original recipe can be skipped if prepping ahead, but the 15-minute lemon brine right before baking is still essential for freshness. 🦪
Sauce Prep
The wine reduction sauce can be made 1 day ahead and stored in an airtight container at room temperature. Reheat gently in a small saucepan over low heat until warm—about 3-4 minutes.
If the sauce thickens too much during storage, whisk in 1-2 teaspoons of hot water to restore its silky consistency. For a shortcut, use store-bought reduced wine sauce (like La Choy or Annie's) and simply warm it through before serving. 🍷
Baguette Storage
Toast the baguette slices and store them in a paper bag at room temperature for up to 2 hours to maintain crispness. If prepping more than a day ahead, wrap the toasted slices in parchment paper and store in an airtight container in the fridge.
Reheat in a 350°F oven for 2-3 minutes before serving to restore crunch. For extra flavor, brush the toasted slices with garlic-infused olive oil before storing. 🍞
Oyster Reheating
If you must reheat the baked oysters, place them on a baking sheet and warm in a 375°F oven for 3-4 minutes—just until the butter melts and becomes bubbly. Avoid microwaving, as it can make the butter greasy and the oysters rubbery.
For best results, always serve oysters fresh from the oven, but this method works well for leftovers. The reheated oysters won’t be as tender as freshly baked, but they’ll still be delicious. ⏰
Assembly Timeline
Plan your timing like this: 1 day ahead, make the butter and sauce. Morning of serving, shuck and brine the oysters. 30 minutes before guests arrive, bake the oysters and toast the baguette.
This keeps everything fresh and ensures the oysters are served at their peak. For large gatherings, assign someone to handle the baguette toasting while you focus on the oysters. 💡
Nutrition facts
Frequently asked questions
How do I know if my oysters are fresh?
Fresh oysters should have tightly closed shells that don't open when tapped gently. The shells should be clean with no cracks, and the meat should smell briny—not fishy or sour. Discard any oysters that are open and don't close when tapped, as they may be spoiled. Always buy from a trusted seafood market or fishmonger.
Can I substitute white wine with something else?
Yes! If you don’t have white wine, use 0.5 cup chicken broth with 1 tablespoon lemon juice for the sauce. For extra depth, add 1 teaspoon dry sherry or apple cider vinegar to mimic the acidity. The key is balancing the richness of the butter with a touch of acid.
Why did my oysters turn rubbery?
Overcooking is the most common cause. Oysters are done at 145°F and should bake for only 8-10 minutes at 425°F. If they curl too much or the meat looks opaque and dry, they’ve been overcooked. For future batches, set a timer and check them early—remove immediately when the butter turns golden.
How do I shuck oysters safely?
Use a sharp oyster knife and wedge it into the hinge of the shell, then twist gently to pry open. Keep your fingers out of the way—the knife can slip! Wear gloves if you’re squeamish. For extra safety, place a towel under the oyster to catch any liquid. If you’re unsure, ask your fishmonger to shuck them for you.
Can I make this recipe without a wine sauce?
Skip the wine reduction and serve the oysters with a simple lemon wedge and hot sauce for dipping. The garlic-herb butter is already flavorful on its own. For a vegetarian pairing, offer a side of roasted cherry tomatoes or a white bean dip to complement the dish.