
Desserts
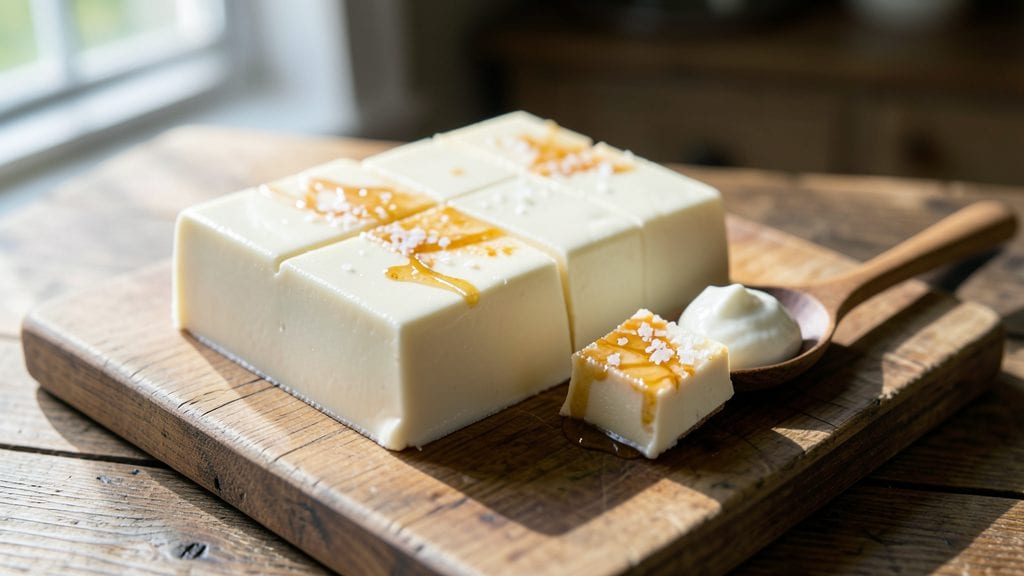
Grandma's old-fashioned white fudge recipe brings back memories of holiday gatherings and kitchen aromas that filled entire neighborhoods. The secret lies in precise sugar boiling to the soft-ball stage—just like my grandmother taught me—and the perfect balance of butter and vanilla that creates those signature creamy layers.
I still remember her warning about not overworking the mixture, which would ruin the delicate texture we all loved.
This recipe delivers a nostalgic treat with its classic combination of smooth, creamy fudge and subtle crunchy bits that appear when cooled properly. The process requires patience—boiling the sugar mixture to exactly 238°F on a candy thermometer—before carefully folding in the butter and vanilla.
My grandmother always said, "Rushing this step is what makes store-bought fudge taste so different."
What you'll end up with is rich, velvety white fudge that's firm enough to slice neatly but still melts beautifully in your mouth. The cooling process is crucial—spreading it thin on a buttered pan creates those perfect crackly edges while keeping the center lusciously creamy.
This is the kind of dessert that brings people together, whether you're serving it at holiday parties or simply enjoying a nostalgic treat with a cup of tea.
Store it in an airtight container at room temperature for up to two weeks, though I can guarantee it won't last that long in your house.
The recipe makes about 2 pounds, perfect for sharing or gifting. Let's get started on creating this timeless classic that's been passed down through generations.
Ingredients for grandma's old fashioned white fudge
Seven simple ingredients transform into nostalgic white fudge with perfect creamy layers and crackly edges.
| Ingredient | Amount | Notes |
|---|---|---|
| Granulated White Sugar 🍚 | 4 cups | Superfine for faster dissolving |
| Unsalted Butter 🧈 | 1 ½ cups | Cold, cubed for folding |
| Pure Vanilla Extract 🌿 | 2 tbsp | High-quality, not imitation |
| Heavy Cream 🥛 | ¼ cup | Cold, for folding in |
| Salt 🧂 | ½ tsp | Fine sea salt |
| Baking Soda 🧪 | ¼ tsp | For smooth texture |
| Corn Syrup 🍯 | ½ cup | Light kind, not dark |
The sugar is the star here—superfine sugar dissolves faster and creates that signature smooth texture. I grab mine from Whole Foods or the bulk section at Kroger because it's less likely to have lumps. If you can't find superfine, pulse regular granulated sugar in a food processor for 30 seconds. The butter? Cold cubes are non-negotiable—room temperature butter will make your fudge greasy. And don't even think about using salted butter. The vanilla extract? Pure Madagascar bourbon from Goya or McCormick is my go-to—it's worth the splurge for that rich depth of flavor. Grandma always said, "Good vanilla makes all the difference."
No corn syrup? Light honey works in a pinch, but reduce the sugar by 2 tablespoons first. Short on heavy cream? Whipping cream at full fat gives the same richness. The baking soda is crucial—it's what creates those little crackly bits when the fudge cools. No baking soda? Skip it entirely—the texture will still be creamy, just without the crunch. And if you're worried about the candy thermometer, 238°F is your target. That's the soft-ball stage, and it's what gives this fudge its signature texture. Trust me, don't rush it—Grandma's warning still holds true.
This fudge keeps beautifully at room temperature for 2 weeks in an airtight container, though I can guarantee it won't last that long. For gifting, wrap it in wax paper and tie with a ribbon—it's always a crowd-pleaser. If you make extra, freeze portions for up to 3 months. Just let it sit at room temperature for 10 minutes before serving. The first slice is always the hardest to resist, but the second one? That's when you'll understand why this recipe has been passed down through generations.
Why You'll Love This Recipe
- No Special Tools: Just a heavy-bottomed saucepan, a wooden spoon, and your patience. No mixer, no fancy thermometer—just sugar, butter, and cream coming together with a gentle simmer. Honestly, I’ve made this on a camping stove and it still turned out buttery perfection.
- Vanilla Kiss Magic: That first drop of pure vanilla extract? It’s the difference between good and ridiculously good. The cream adds a velvety smoothness, while a pinch of salt—don’t skip it—balances the sweetness like a secret handshake. It’s the kind of flavor that makes you want to lick the spoon.
- Gift-Worthy in Minutes: Wrap it in wax paper, tie it with twine, and suddenly you’ve got a handmade treat for birthdays, holidays, or just because. Between us, my neighbors now expect a jar of this every Christmas—no recipe card needed.
- Pantry Staple Power: Five ingredients, all things you already own. No weird substitutions, no last-minute grocery runs. And if you make a double batch? It keeps for weeks in an airtight container, so you’re always ready for cravings—or impromptu guests. My secret weapon for lazy Sundays.
Step-by-step instructions for grandma's old-fashioned white fudge
This classic recipe delivers that perfect nostalgic crunch and velvety creaminess we all love!
Combine Sugar, Corn Syrup, and Butter
In a heavy-bottomed saucepan, combine the 4 cups granulated white sugar, 0.5 cup corn syrup, and 1.5 cups unsalted butter. Place the pan over medium-high heat and bring the mixture to a boil without stirring. This step is crucial—stirring too early can cause sugar crystals to form, ruining our smooth texture.
Once boiling, reduce heat to medium and continue cooking until the mixture reaches 238°F on a candy thermometer. You'll notice the sugar dissolving completely and the mixture turning a light amber color. This is where the magic happens—the sugar transforms into that perfect fudge base. Keep a close eye on it to avoid burning, as sugar can go from perfect to burnt in seconds!
Add Salt and Baking Soda
Remove the pan from heat and let it cool for exactly 2 minutes. This brief cooling period prevents a sudden temperature shock when we add the salt and baking soda. Stir in the 0.5 teaspoon salt and 0.25 teaspoon baking soda. The baking soda helps create that signature fudge texture, while the salt enhances all the sweet flavors.
Here's the thing—don't skip this cooling step! Adding the baking soda too soon can cause the mixture to foam over and potentially bubble out of the pan. After stirring, return the pan to medium heat and bring the mixture back to a boil. You'll see it start bubbling vigorously again, which is exactly what we want.
Prepare for Creamy Folding
Remove the pan from heat once more and let it cool for another 3 minutes until the mixture reaches about 110°F. This temperature is perfect for folding in our cold ingredients without scrambling the eggs or causing the mixture to seize up. In a separate bowl, whisk together the 0.25 cup cold heavy cream and 2 tablespoons pure vanilla extract until well combined.
I know it seems weird to cool the mixture twice, but trust me—this patience pays off with that perfect creamy texture. The cold cream and vanilla will create those beautiful, glossy layers that make this fudge so special. Have your whisk ready because we're about to work quickly!
Fold in Cream Mixture
Now for the most exciting part—folding! With a wooden spoon or spatula, quickly pour about half of the hot sugar mixture into the cream bowl. Stir vigorously for about 1 minute until well combined. Then pour the remaining hot mixture back into the saucepan and quickly fold in the cream mixture from the bowl.
Work fast but carefully—you want to maintain that creamy consistency without overmixing. The mixture should thicken noticeably as you fold. Here's a pro tip: if it starts looking too thick, don't panic—just keep folding until it reaches that perfect fudge consistency. You'll know it's right when it coats the back of your spoon smoothly but still has a nice pouring quality.
Pour and Set the Fudge
Quickly pour the fudge mixture into a greased 8x8-inch baking dish or similar size. I like to use parchment paper on the bottom for easy removal later. Tap the dish gently on the counter to release any air bubbles—this ensures a smooth surface when it sets.
Let the fudge cool completely at room temperature for about 3 hours, or until it's firm enough to cut. Don't rush this step! Proper cooling is what gives us that perfect snap when we cut into it. Once set, cut into squares using a sharp knife dipped in hot water between cuts. This makes clean, professional-looking pieces every time.
Pro Tips For Making Grandma'S Old Fashioned White Fudge
- Boil to 238°F: That thermometer reading isn’t arbitrary—stop when the sugar-butter mix hits 238°F. Any hotter and you’ll burn the butter before the cream’s ready, leaving you with that acrid, overcooked taste. I learned this the hard way after a batch tasted like caramelized regret.
- Whisk in cream slowly: Pour the heavy cream into the hot sugar mixture a little at a time, whisking like your life depends on it. Dumping it all at once? You’ll get lumps—or worse, a scrambled mess. Start with ¼ cup, wait for it to dissolve, then add the rest. Patience here makes the difference between creamy fudge and gluey disappointment.
- Salt the butter first: Toss that pinch of salt into the melted butter before mixing with sugar. Skipping this means your fudge will taste flat, no matter how much vanilla you add. Trust me, the butter’s flavor carries through—don’t let it get lost in the sweetness.
- Beat until stiff peaks: Don’t stop beating the fudge just because it looks done. Keep going until it holds stiff peaks when you lift the spatula—like whipped cream, but denser. This ensures it slices cleanly and doesn’t ooze everywhere. (Yes, your arm will ache, but it’s worth it.)
Dietary considerations for grandma's old fashioned white fudge
Gluten-Free Adaptation
This classic white fudge is naturally gluten-free since it contains no grains or wheat-based ingredients. The recipe relies on sugar, butter, and corn syrup—all gluten-free staples. However, if you're using a pre-made corn syrup blend, double-check the label to ensure it's certified gluten-free.
I always opt for Karo Light Corn Syrup, which is reliably gluten-free and perfect for this recipe. 🌾
Dairy-Free Options
For a dairy-free version, replace the butter and heavy cream with dairy-free butter substitutes like Earth Balance or Miyoko's. Use full-fat coconut cream instead of heavy cream—just make sure it's chilled before folding. The texture will be slightly different but still delicious.
I've found that using 1.5 cups dairy-free butter and 0.25 cup chilled coconut cream gives the best results. The vanilla extract remains the same since it's dairy-free.
Nut-Free Considerations
This recipe is naturally nut-free, making it safe for those with nut allergies. However, always check your vanilla extract and corn syrup for cross-contamination warnings if severe allergies are a concern. I recommend McCormick Pure Vanilla Extract, which is processed in a nut-free facility.
When serving, avoid garnishes like chopped nuts or toffee bits to maintain the nut-free status. The fudge's creamy texture shines on its own without any nut-based additions. 🌟
Vegan Adaptation
To make this recipe vegan, substitute the butter with vegan butter like Miyoko's or Earth Balance, and use full-fat coconut cream instead of heavy cream. The corn syrup and vanilla extract are already vegan-friendly. The texture will be slightly denser, but the sweet, creamy flavor remains intact.
I've had great success with this adaptation, though it's important to note that the cooling process might take an extra 30 minutes due to the coconut cream's higher fat content.
Lower Sugar Version
If you're watching your sugar intake, you can reduce the sugar by ½ cup and replace it with ½ cup pure maple syrup or monk fruit sweetener. The fudge will still set properly but may have a slightly softer texture.
I've found that using 3.5 cups sugar and ½ cup maple syrup works well while keeping the traditional fudge experience. The flavor remains rich and satisfying, just with a touch of natural sweetness from the maple. 🍯
Allergen Safety
For those with multiple food sensitivities, this recipe is a safe bet as long as you use certified gluten-free ingredients and avoid cross-contamination. I always recommend preparing the fudge in a clean workspace, especially if you're also handling nuts, dairy, or other allergens.
Store the finished fudge in an airtight container with a label noting any substitutions made. This way, you can confidently share it with friends and family who have dietary restrictions. The classic flavor stands out no matter the adaptation! 💛
Nutrition facts
Frequently asked questions
Why does my fudge turn out grainy instead of smooth?
Graininess happens when sugar crystals form before the mixture reaches the proper temperature. Always bring the sugar to exactly 238°F on a candy thermometer—never guess by color. Also, avoid stirring the mixture while it's boiling, and make sure your butter is cold when folding it in. Stirring too early or using warm butter can create crystals.
Can I make this fudge without corn syrup?
Yes! Replace the ½ cup corn syrup with ½ cup light honey or ½ cup agave nectar, but reduce the sugar by 2 tablespoons first. The texture will be slightly softer, but still delicious. Just be careful—honey can darken the fudge color slightly. For a more traditional texture, stick with the corn syrup.
How do I know when the fudge is fully set before cutting?
The fudge is ready when it's firm enough to hold its shape but still has a slight give in the center. Press your finger gently—if it springs back slowly, it's perfect. Typically, this takes 3 hours at room temperature. If your kitchen is very warm, it may need 4 hours. Patience here makes all the difference for clean slices!
What's the secret to getting those perfect crackly edges?
Spread the fudge in a thin, even layer on a buttered pan—about ¼-inch thick. The thinner the layer, the more pronounced the crackly edges will be. Also, let it cool completely at room temperature before cutting. Rushing the cooling process (like refrigerating it) will make the fudge too soft and prevent those satisfying cracks.
Can I add food coloring or mix-ins like chocolate chips?
Traditional white fudge relies on its pure, creamy texture, so avoid food coloring. However, you can gently fold in ½ cup mini chocolate chips or toasted coconut flakes after the fudge has set but before it fully hardens. For best results, add them just before serving. Too many mix-ins can make the fudge too dense and ruin the classic experience.