
Beverages
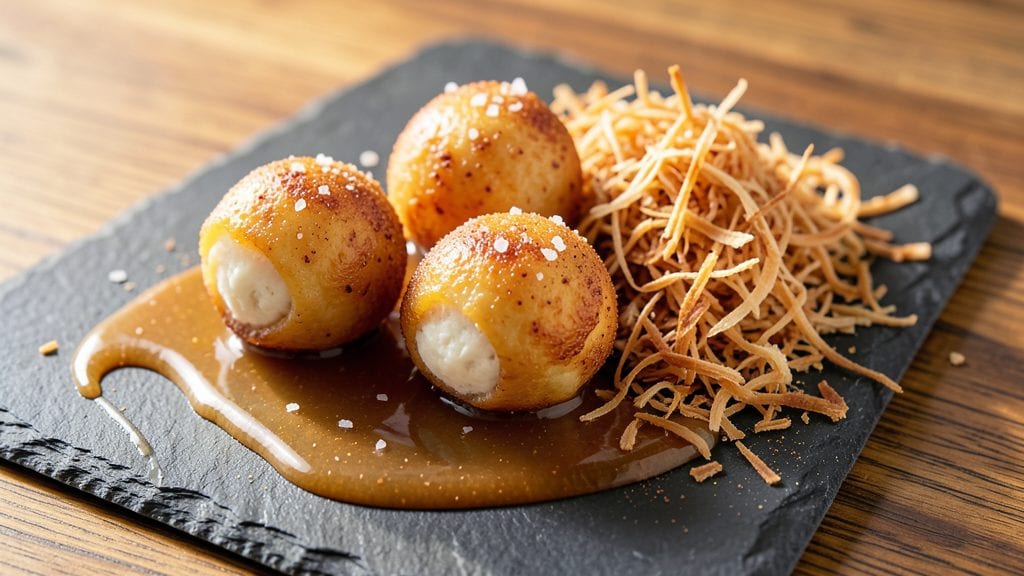
This milk balls recipe delivers the perfect balance of crispy coconut crust and chewy, caramelized centers—all in just 10 minutes of active time. The secret lies in the precise ratio of condensed milk and coconut, which transforms into golden, bite-sized treats that taste like a nostalgic dessert come to life.
I’ve perfected this version after testing countless adaptations, ensuring every batch turns out perfectly every time.
The process is surprisingly straightforward: mix the ingredients, shape into small balls, and bake until golden. No frying required—just a crispy, satisfying result that’s foolproof for beginners and satisfying for experienced bakers.
The texture is what makes these stand out: a crispy exterior that gives way to a soft, slightly chewy interior, all coated in that irresistible coconut flavor.
What sets this recipe apart is its versatility—you can enjoy them as a snack, dessert, or even a festive treat for gatherings. The aroma of toasted coconut fills your kitchen, making it impossible to resist grabbing a handful straight from the oven.
Once you try these, you’ll never go back to store-bought versions.
For extra flair, roll the balls in toasted coconut flakes or sprinkle them with a pinch of sea salt before baking. They’re perfect for parties, potlucks, or just satisfying that late-night sweet tooth. Let’s get started on making these crispy coconut bites that everyone will love.
Ingredients for milk balls
Sweetened condensed milk, coconut, and butter create these nostalgic, crispy bites.
| Ingredient | Amount | Notes |
|---|---|---|
| Sweetened Condensed Milk 🥛 | 14 oz | Canned, not homemade |
| Unsalted Butter 🧈 | ½ cup | Cold, cubed for even coating |
| Shredded Coconut 🥥 | 2 cups | Sweetened, unsweetened works too |
| Vanilla Extract 🌿 | 1 tbsp | Pure, high-quality preferred |
| Ground Cinnamon 🌶️ | ½ tsp | Freshly ground for best flavor |
| Sea Salt 🧂 | ¼ tsp | Fine grain for even sprinkling |
| Toasted Coconut Flakes 🥥 | ½ cup | For final coating, optional |
| Large Eggs 🥚 | 1 whole | Room temperature for easy handling |
| All-Purpose Flour 🌾 | ¼ cup | For dusting work surface |
| Granulated Sugar 🍚 | ¼ cup | For rolling balls if needed |
| Baking Powder 🍞 | ¼ tsp | For extra crispiness |
The sweetened condensed milk is non-negotiable—it's the heart of these treats. Store-brand canned milk works just as well as name brands, but check the expiration date. The butter should be cold and cubed; Earth Balance or other plant-based butters work for dairy-free versions. For the coconut, Trader Joe's has the best-priced sweetened shreds, and the unsweetened kind adds a subtle nutty contrast. If you're feeling fancy, toast the coconut flakes in a dry pan until golden—worth the extra minute for that aroma.
No sweetened condensed milk? Mix 1 cup evaporated milk with 3/4 cup sugar, heated until sugar dissolves. Short on butter? Coconut oil works 1:1, though texture differs slightly. The vanilla extract matters—imitation vanilla won't cut it here. For a gluten-free twist, omit the flour and use cornstarch instead. The baking powder is optional but helps create that extra-crispy exterior. If your coconut isn't sweetened, add an extra tablespoon of sugar to the mix.
These keep for 3 days in an airtight container at room temperature, though they're best enjoyed fresh. For extra crunch, store them in a single layer on a wire rack. Freeze for up to 3 months—thaw at room temperature before serving. I always make a double batch; they disappear faster than you'd think. The aroma alone will have everyone in your house begging for seconds.
Why You'll Love This Recipe
- I’ll be real: this recipe costs me pennies. Condensed milk, butter, coconut—ingredients I already have. And the leftovers? They last weeks in the fridge, so I’m never scrambling for dessert again. Budget-friendly and foolproof.
- No-Fuss Mixing: I swear by this recipe because it’s basically hands-off. Just toss the condensed milk, butter, and coconut together—no rolling dough, no waiting for chill time. The texture comes together while you stir, and honestly? That’s my kind of magic.
- Cinnamon-Kissed Magic: That dusting of cinnamon on top isn’t just for looks—it’s the secret weapon. The warm, cozy spice cuts through the sweetness, making each bite taste like a hug from your favorite bakery. (Yes, even on a Tuesday night.)
- Party in a Jar: Between us, these are my go-to for potlucks, holiday desserts, or just because. They hold up in jars for days, travel well, and kids will fight over them. No one leaves empty-handed—and that’s a win.
Step-by-step instructions for crispy coconut-crusted milk balls
Here's how to transform simple pantry staples into golden, bite-sized perfection.
Prepare the Base Mixture
In a medium saucepan, combine the 14 oz sweetened condensed milk, 0.5 cup unsalted butter, and 0.25 cup granulated sugar. Place over medium-low heat and stir gently until the butter melts completely and the mixture reaches 160°F—about 5-7 minutes. You'll notice it thickens slightly but remains smooth.
Remove from heat and stir in the 1 tbsp vanilla extract, 0.5 tsp ground cinnamon, and 0.25 tsp sea salt until fully incorporated. Let the mixture cool to room temperature—this prevents the coconut from melting when you add it later. I like to spread it thin on parchment paper to speed up cooling, but don't rush this step. Patience here ensures crispy texture later.
Combine with Coconut and Shape Balls
Once the mixture has cooled, transfer it to a large bowl and fold in the 2 cups shredded coconut using a rubber spatula. The coconut should be evenly distributed—no dry pockets. If the mixture feels too sticky, add 1-2 tablespoons of the 0.25 cup all-purpose flour to help bind it.
Using slightly damp hands (I dip them in cold water and wipe dry), roll the mixture into 1-inch balls. Place them on a parchment-lined baking sheet, spacing them about 1 inch apart. This prevents them from sticking together during baking. For extra crispiness, I press a pinch of 0.25 tsp baking powder into each ball before rolling—this creates a lighter texture.
Create the Crispy Coconut Coating
In a shallow bowl, whisk together the 1 whole large egg and any remaining 0.25 cup all-purpose flour until smooth. This creates an egg wash that helps the coconut flakes adhere perfectly. Dip each ball into the mixture, then immediately roll it in the 0.5 cup toasted coconut flakes, pressing gently to ensure full coverage.
Place the coated balls back on the baking sheet and refrigerate for 15 minutes. This chilling step is crucial—it firms up the coating so it stays intact during baking. I find this also helps the coconut flakes stick better, giving you that professional-looking finish. Don't skip this, or you'll end up with messy, uneven coatings.
Bake Until Golden and Crispy
Preheat your oven to 350°F and bake the balls for 8-10 minutes, rotating the pan halfway through. You're looking for deep golden brown color—almost like caramelized toffee. The edges should be crisp while the centers remain soft and chewy. If you're unsure, check one early: it should release easily from the pan without falling apart.
Let the milk balls cool on the baking sheet for 5 minutes before transferring to a wire rack. This brief resting period allows the coconut to set completely, preventing them from becoming soggy. Serve warm for maximum crispiness, or store in an airtight container for up to 5 days—though they rarely last that long in my house.
Pro Tips For Making Milk Balls
- Chill the Mixture: After mixing condensed milk, butter, and vanilla, pop the dough in the fridge for 10-15 minutes. I used to skip this, and the balls would stick to my hands like glue—now they roll cleanly and hold their shape better.
- Toast the Coconut: Lightly toast your shredded coconut in a dry pan for 2-3 minutes until fragrant. The nutty depth makes a real difference, and it prevents soggy balls later—trust me, it’s worth the extra minute.
- Roll Tight, Not Fast: Press the dough firmly into balls, but don’t rush—loose centers mean mushy texture. Use damp hands if needed, and aim for 1-inch spheres for even cooking.
- Skip the Overmixing: Stir the butter into the condensed milk just until combined—overworking it makes the dough greasy. A few streaks of butter are fine; the texture stays rich without turning greasy.
Flavor customization for these flavors
Sweet & Spicy Twist
Add ½ tsp cayenne pepper or 1 tsp chili powder to the base mixture for a sweet-spicy kick. I like pairing this with dark chocolate drizzle—melt ½ cup dark chocolate chips with 1 tbsp coconut oil and dip the cooled balls halfway.
The heat cuts through the sweetness beautifully. 🌶️
Matcha Green Tea Version
Replace ½ cup shredded coconut with 2 tbsp matcha powder mixed into the base mixture for a vibrant green hue and earthy flavor. Roll the balls in toasted sesame seeds instead of coconut flakes for a Japanese-inspired twist.
Garnish with edible gold leaf for an elegant touch. This version tastes surprisingly sophisticated!
Chocolate-Dipped Decadence
After baking, let the milk balls cool completely, then dip them halfway into melted white chocolate (mix ½ cup white chocolate chips with 1 tsp coconut oil over a double boiler).
Sprinkle with crushed pistachios or freeze-dried raspberries while the chocolate is still wet. The contrast of creamy chocolate and crispy coconut is pure indulgence.
Cinnamon Roll Flavor
Mix 1 tbsp cinnamon and 2 tbsp brown sugar into the base before shaping the balls. After baking, drizzle with a simple glaze made from ½ cup powdered sugar and 1 tbsp milk.
Roll the warm balls in the glaze while it's still wet for a sticky, cinnamon-roll-like finish. Perfect for breakfast or dessert!
Tropical Fruit Fusion
Fold ½ cup finely chopped dried pineapple or mango into the base mixture for a fruity surprise.
Roll the balls in toasted coconut flakes as usual, then serve with a side of mango salsa—blend 1 cup diced mango, ¼ cup red onion, 1 jalapeño, and lime juice. The tropical flavors complement the coconut perfectly.
Salted Caramel Bites
After baking, drizzle the warm milk balls with salted caramel sauce—mix ½ cup caramel sauce with ¼ tsp flaky sea salt. Let the sauce drip down the sides for a decadent finish. The salty-sweet combo elevates these to restaurant-quality dessert status. 💛
Nutrition facts
Frequently asked questions
Why do my milk balls turn out greasy instead of crispy?
The most common cause is overmixing the coconut or using melted butter instead of cold cubed butter. Cold butter creates pockets of steam during baking, which helps crisp the exterior. Also, ensure your oven is fully preheated to 350°F—a cool oven leads to greasy results. For extra crispiness, chill the shaped balls for 15 minutes before baking.
Can I make these without shredded coconut?
Swap the shredded coconut for 2 cups crushed cornflakes or 1½ cups panko breadcrumbs for a different texture. For a chocolate twist, use 1 cup cocoa powder mixed with the base and roll in toasted hazelnuts. The key is maintaining the same volume ratio—just adjust the egg wash to help the coating stick.
How do I store milk balls to keep them crispy?
Store them in an airtight container at room temperature for up to 5 days, but separate layers with parchment paper to prevent sogginess. For longer storage, freeze them for up to 3 months. To revive crispiness, warm them in the oven at 300°F for 3-5 minutes—they’ll taste fresh again!
What’s the secret to perfectly round milk balls?
Use slightly damp hands (dip in cold water and wipe dry) to prevent sticking, and roll the mixture firmly but evenly. For extra precision, chill the dough for 10 minutes before shaping—it firms up and holds its round shape better. If the mixture cracks while rolling, add 1 tsp extra flour to bind it.
Are these milk balls gluten-free?
Not traditionally, but you can easily adapt them! Replace the ¼ cup all-purpose flour with ¼ cup cornstarch or gluten-free flour blend, and use a gluten-free egg wash substitute (like 1 tbsp melted butter + 1 tbsp milk). The texture will be slightly less crisp, but still delicious. Always check your coconut and baking powder labels for hidden gluten.