
Main Courses
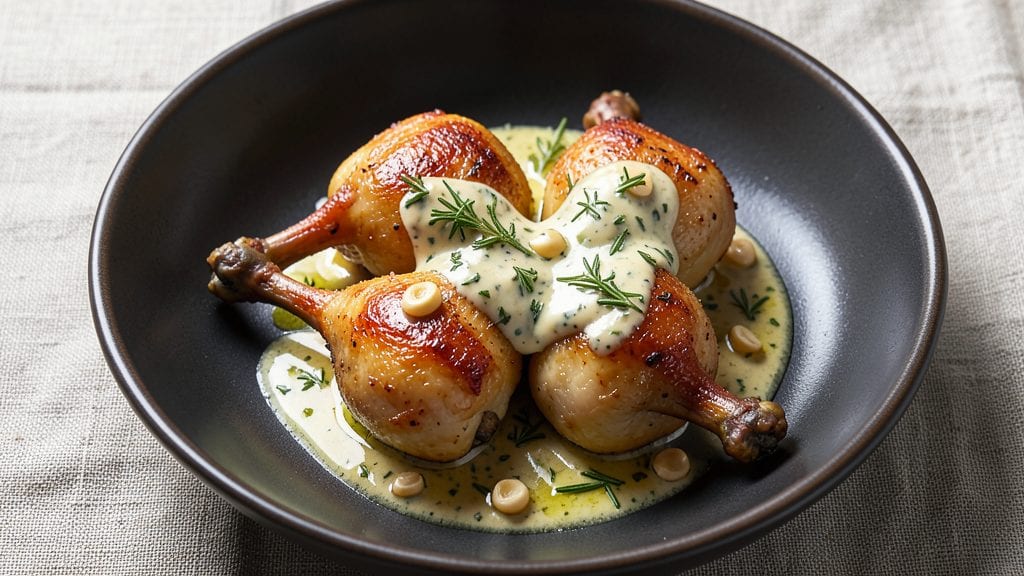
Mastering quail legs recipe delivers restaurant-quality results with searing-hot crisp skin and silky centers—something I perfected after years of experimenting with game bird techniques.
Standing on a step stool in my grandmother’s kitchen in Sicily, I learned how to balance heat and timing, a lesson that transformed quail from intimidating to foolproof. The secret lies in a high-heat sear followed by precise internal temperature control, ensuring every bite is tender yet dramatic.
This method transforms delicate quail legs into a showstopper main course with minimal effort—just 20 minutes of active cooking time. You’ll need simple ingredients like butter, herbs, and salt, but the technique elevates them into something extraordinary.
The crisp skin forms instantly over the oven-finished centers, creating a contrast that’s both satisfying and elegant. It’s the kind of dish that makes guests ask for the recipe before dessert.
What you’ll achieve is a plate of quail legs that looks and tastes like it belongs on a fine-dining menu, yet requires no special equipment beyond a skillet and oven. The aroma alone—smoky, herby, and rich—will have everyone gathering around the table.
Serve with roasted vegetables or a bright citrus salad to balance the richness, and you’ve got a meal that’s equal parts impressive and effortless.
Whether you’re cooking for a special occasion or simply treating yourself to a refined weeknight dinner, this recipe delivers professional results without the fuss. Let’s get started—your taste buds (and dinner guests) will thank you.
Ingredients for quail legs
Simple ingredients transform into restaurant-worthy quail legs with crisp skin and tender centers.
| Ingredient | Amount | Notes |
|---|---|---|
| Quail Legs 🦆 | 8 whole | Fresh, skin-on, bone-in preferred |
| Unsalted Butter 🧈 | ½ cup | European-style, cold for searing |
| Fresh Rosemary 🌿 | ¼ cup | Finely chopped, fresh preferred |
| Fresh Thyme 🌿 | ¼ cup | Leaves only, finely chopped |
| Garlic Cloves 🧄 | 6 cloves | Minced, fresh preferred |
| Diamond Crystal Kosher Salt 🧂 | 1 ½ tbsp | For seasoning and brining |
| Freshly Ground Black Pepper 🌶️ | ½ tsp | Freshly cracked preferred |
| Extra-Virgin Olive Oil 🫒 | 2 tbsp | For finishing drizzle |
| Lemon Zest 🍋 | 1 tbsp | Freshly grated, bright yellow |
| Fresh Lemon Juice 🍋 | 1 tbsp | From 1 lemon, freshly squeezed |
| All-Purpose Flour 🌾 | 2 tbsp | For dredging, light coating |
| Crushed Red Pepper Flakes 🌶️ | ½ tsp | Optional, for heat |
The quail legs are non-negotiable—fresh, skin-on, bone-in is ideal, and you’ll find them at specialty butchers or well-stocked grocery stores like Whole Foods or Trader Joe's. If your local market doesn’t carry them, check the frozen section (thaw overnight). The butter matters too—European-style has higher fat content, perfect for crisp skin. I always grab mine from Costco in bulk. For herbs, fresh is non-negotiable here—rosemary and thyme should be vibrant green, not wilted or yellowing. If you’re feeling fancy, grab organic from the farmers market, but the regular stuff works fine if it’s fresh.
No fresh herbs? Dried rosemary and thyme at one-third the amount will work, but fresh is worth the trip. Running short on butter? Lard or duck fat works for searing (same quantity), though butter’s flavor is unmatched. The flour is just for dredging—all-purpose works fine, but if you’ve got bread flour, it’ll give you an even crispier crust. For the garlic, peeled and minced is key—no pre-minced from jars. The crushed red pepper is optional, but trust me, it adds a subtle kick that pairs perfectly with the richness of the quail.
Quail legs cook fast—use within 2 days of purchase for best results. Store them skin-side up on a plate in the fridge, uncovered, so they don’t steam. The herbs? Wrap them in damp paper towels and seal in a bag—lasts 5 days. Butter can be stored at room temperature (if it’s not too warm) or in the fridge. Once cooked, leftovers reheat beautifully in a 350°F oven for 10 minutes, but honestly, they’re best fresh off the skillet.
Why You'll Love This Recipe
- One-Pan Magic: I swear by this recipe for lazy days—just toss the quail legs, butter, and herbs on a sheet pan, roast, and walk away. No fancy prep, no extra pots, and honestly? The best part is how little cleanup there is.
- Herb-Butter Bliss: That golden butter basting with rosemary and thyme? It’s where this dish gets its magic. The quail stays juicy while the edges get crispy, and the garlic? It’s the quiet flavor hero no one can resist.
- Weeknight to Dinner Party: Serve it with crusty bread and a simple salad for a weeknight meal, or dress it up with a white wine reduction for guests. Same recipe, just different vibes—because quail feels fancy without the fuss.
- Budget-Friendly Luxury: Quail is cheaper than you think, and a few legs go a long way. I’ve made this for two or six, and leftovers reheat beautifully. Plus, the butter and herbs stretch the flavor so you won’t miss the expensive cuts.
Step-by-step instructions for crisp-skinned quail legs
Here's how to transform delicate quail legs into restaurant-worthy bites with perfect texture every time.
Prepare the Herb Butter and Season the Quail
In a small bowl, combine the 0.5 cup unsalted butter, 0.25 cup finely chopped fresh rosemary, 0.25 cup fresh thyme leaves, 6 minced garlic cloves, 1.5 tablespoons diamond crystal kosher salt, and 0.5 teaspoon freshly ground black pepper. Mix until the herbs are evenly distributed throughout the butter. You'll use this later to baste the quail and create that signature herb-infused crust.
While the butter mixture chills in the refrigerator, pat the 8 whole quail legs completely dry with paper towels. This step is crucial—any moisture on the skin will prevent proper browning. Place the quail legs skin-side up on a plate and season both sides generously with additional diamond crystal kosher salt and freshly ground black pepper if needed. Let them sit at room temperature for 30 minutes before cooking.
Create the Perfect Crispy Skin
Heat a large oven-safe skillet over medium-high heat. Add 2 tablespoons extra-virgin olive oil and let it get hot but not smoking. Working in batches to avoid crowding, place the quail legs skin-side down in the skillet. Press down gently on each leg with a small spatula for 10 seconds to ensure full contact with the hot surface. This creates that coveted crispy skin.
Cook the quail legs undisturbed for 4-5 minutes until the skin is deeply golden brown and crispy. You'll know they're ready when they release easily from the skillet. Flip each leg and cook for another 3-4 minutes until the skin on the other side is also golden brown. Transfer the cooked quail legs to a warm plate and tent loosely with aluminum foil to keep them warm.
Baste and Finish in the Oven
Return the skillet to medium heat and add the herb butter mixture. Let it melt completely, scraping up any browned bits from the bottom of the pan. These flavorful bits are called fond and they're packed with concentrated flavor. Once the butter is fully melted and bubbling, remove the skillet from heat.
Place the skillet with the melted herb butter in a preheated 375°F oven. Arrange the quail legs skin-side up in the skillet, spooning the herb butter evenly over each piece. Bake for 8-10 minutes until the quail legs reach an internal temperature of 160°F when measured at the thickest part of the meat. The skin should remain crispy while the centers stay juicy and tender.
Add Bright Citrus and Serve Immediately
Remove the quail legs from the oven and transfer them to a serving platter. Drizzle with the 1 tablespoon fresh lemon juice and sprinkle with the 1 tablespoon lemon zest. The citrus cuts through the richness of the butter and adds a bright, fresh contrast to the dish. You can also sprinkle with the 0.5 teaspoon crushed red pepper flakes if you'd like a subtle heat.
For an extra touch of texture, lightly dredge the quail legs in the 2 tablespoons all-purpose flour mixed with a pinch of additional diamond crystal kosher salt. This creates a delicate, flour-dusted finish that adds another layer of complexity to each bite. Serve immediately with your choice of sides like roasted vegetables or a simple green salad to highlight the delicate flavors of the quail.
Pro Tips For Making Quail Legs
- Sear First, Then Butter: Get that pan screaming hot before adding the quail legs—cast iron or stainless steel works best. Once they’re golden and release easily (about 2-3 minutes per side), pull them out, then melt the butter with herbs and garlic to baste. I used to add butter too early, and the legs just steamed instead of developing that crisp crust.
- Trim the Fat, Not the Flavor: Pat the quail legs dry, then use kitchen shears to snip off any excess fat patches—just the ones, not the whole thigh. Too much fat can make the butter burn when you baste later. My grandmother swore by this, and she was right: the legs stay juicier without sacrificing richness.
- Don’t Overcrowd the Pan: Cook the quail legs in batches if needed—even if it means two rounds in the pan. Crowding drops the temperature, and you’ll end up with sad, greasy legs instead of crispy ones. I learned this the hard way after a dinner party where the second batch turned out like boiled chicken.
- Rest Under Foil: After roasting, tent the quail legs loosely with foil and let them sit for 5-10 minutes. This traps heat so the juices redistribute instead of pooling out when you cut in. I skip this when I’m lazy, but the dish is noticeably better when I don’t—especially with quail, which is so small and dries out fast.
Storing and reheating this recipe
Refrigerator Storage
Quail legs stay fresh in the fridge for up to 2 days if stored properly. Place them skin-side up on a plate, uncovered, to prevent steaming.
I wrap any extra herb butter in plastic wrap and store it in the fridge too—it keeps for 5 days and makes a great topping for toast or pasta later. 🧈
Freezer Prep
For longer storage, freeze quail legs raw in a single layer on a tray for 1 hour before transferring to a freezer bag. This prevents freezer burn. They’ll keep for 3 months—just thaw overnight in the fridge before cooking.
I like to label bags with the date and recipe name so I don’t forget what’s inside.
Reheating Leftovers
Quail legs reheat best in a 375°F oven for 8-10 minutes on a wire rack over a baking sheet. This keeps the skin crispy while warming the meat through. Avoid microwaving—it turns the skin rubbery. For extra flavor, brush with a little melted butter and fresh herbs before reheating. 🔥
Make-Ahead Tips
Prep the herb butter and season the quail legs 1 day ahead—it saves time on cooking day. Store everything in separate containers in the fridge. I even go as far as searing the quail legs the night before, then finish them in the oven the next day.
Just reheat briefly to maintain crispness.
Crisp Skin Revival
If reheated quail loses its crisp skin, pop it back in a 400°F oven for 2-3 minutes with a fresh pat of butter. The high heat will restore that golden crunch. This trick works wonders for restaurant-quality results at home. I’ve used it for everything from quail to duck legs!
Portioning for Meals
Divide quail legs into individual portions before freezing or storing. This makes reheating easier and prevents overcooking. I like to wrap each leg in parchment paper before freezing—it keeps them separate and makes them look like they’re straight from a gourmet package. Perfect for meal prep! ✨
Nutrition facts
Frequently asked questions
How do I know when quail legs are fully cooked?
Use a meat thermometer to check the internal temperature at the thickest part of the leg—it should reach 160°F. The skin should be crispy and golden brown, while the meat inside will be tender and juicy. Overcooking can make the meat dry, so don't exceed 165°F.
Can I substitute chicken thighs for quail legs?
While chicken thighs work in a pinch, they're much larger and won't give the same delicate texture. If substituting, use 4-6 small thighs instead of 8 quail legs and reduce cooking time by 2-3 minutes total. The herb butter method still applies, but expect a different eating experience.
Why did my quail legs turn out dry?
Overcooking is the most common cause—quail cooks faster than chicken or turkey. Always use a meat thermometer and remove them from heat at 160°F. Another culprit is skipping the room-temperature step or not patting them dry before cooking. Try brining them for 30 minutes in salted water next time for extra moisture.
What sides pair best with quail legs?
For a balanced meal, try roasted seasonal vegetables (like asparagus or Brussels sprouts) or a bright citrus salad with arugula and shaved fennel. The crisp skin contrasts beautifully with creamy polenta or fluffy wild rice. For a Sicilian touch, serve with caponata or a simple tomato-basil salad.
How can I make this recipe ahead of time?
Prepare the herb butter and season the quail legs 1 day ahead—store separately in the fridge. For maximum prep, sear the quail legs the night before, then finish in the oven the next day. Reheat at 375°F for 8-10 minutes to restore crispness. The flavors actually improve overnight!