
Desserts
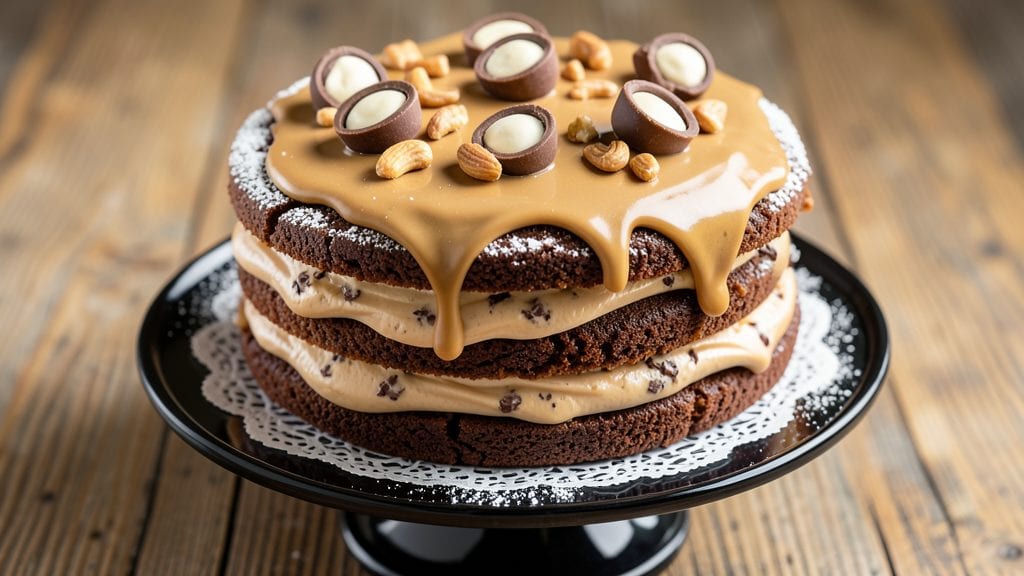
This Reese's peanut butter ice cream cake recipe combines the best of both worlds—rich, fudgy peanut butter cake layers and velvety ice cream filling, all held together with a peanut butter glaze.
The secret lies in balancing dense cake with cool cream, creating a dessert that's decadent yet surprisingly easy to assemble. I've perfected this recipe after years of testing, ensuring every bite delivers that perfect contrast of warm chocolate-peanut butter and creamy vanilla.
The cake layers are moist and packed with peanut butter flavor, while the ice cream filling stays perfectly chilled until the final assembly.
What makes this recipe work is the precise timing—baking the cake slightly ahead, letting the ice cream firm up, and assembling everything just before serving to prevent melting. This isn't just dessert; it's an experience that tastes like childhood nostalgia meets professional bakery quality.
By the time you're done, you'll have a stunning cake with layers of fudgy peanut butter cake, creamy ice cream, and a glossy peanut butter glaze on top. The contrast of warm cake and cool cream in every bite is what makes this dessert unforgettable.
Whether you're celebrating a special occasion or just craving something indulgent, this cake delivers every time.
The best part? You can customize it with crushed Reese's pieces, chocolate shavings, or even a drizzle of caramel for extra flair. Let's get started on creating this showstopper dessert that will have everyone asking for seconds.
Ingredients for reese's peanut butter ice cream cake
Fudgy cake layers, cool ice cream cream, and a glossy peanut butter glaze - this is your ultimate Reese's showstopper!
| Ingredient | Amount | Notes |
|---|---|---|
| All-Purpose Flour 🌾 | 2 ½ cups | Sifted for light texture |
| Creamy Peanut Butter 🥜 | 1 ½ cups | Natural, unsweetened preferred |
| Granulated Sugar 🍚 | 2 cups | White or light brown |
| Light Brown Sugar 🍚 | ½ cup | Packed for moisture |
| Baking Powder 🧂 | 2 tsp | Freshly measured |
| Baking Soda 🧂 | ½ tsp | Aluminum-free preferred |
| Salt 🧂 | ½ tsp | Fine sea salt |
| Large Eggs 🥚 | 2 whole | Room temperature |
| Unsalted Butter 🧈 | 1 cup | Room temperature, cubed |
| Vanilla Extract 🌿 | 2 tsp | Pure extract preferred |
| Crushed Reese's Pieces 🍫 | 1 cup | For extra peanut butter crunch |
| Vanilla Ice Cream 🍦 | 3 cups | Premium brand like Breyers |
| Heavy Whipping Cream 🥛 | ½ cup | Cold for glaze |
| Powdered Sugar 🍚 | 1 cup | For glaze sweetness |
| Crushed Peanuts 🥜 | ¼ cup | Optional topping |
The peanut butter is the star here. Natural, unsweetened gives the best flavor without added oils or sugars that can make the cake dense. Jif Natural or Smucker's work perfectly, but if you're using regular creamy peanut butter, reduce the sugar by 1 tbsp. The crushed Reese's pieces? Use the classic candy—no need for fancy brands here. For the ice cream, Breyers or Blue Bell brands stay firm longer during assembly, which is key for clean slices. Grab a tub of vanilla that's at least 1 quart so you have enough for filling and potential leftovers.
No crushed Reese's? Crush your own by pulsing them in a food processor or bagging them and rolling with a rolling pin. Short on powdered sugar for the glaze? Mix 1 tbsp cornstarch with 1 cup granulated sugar—it works in a pinch. The cake layers can be made a day ahead and stored wrapped at room temp, but the ice cream filling needs to be added fresh. If you're worried about melting, chill the assembled cake for 10 minutes before serving. The crushed peanuts on top? Totally optional, but they add that extra crunch that makes it feel like a bakery dessert.
This cake is a crowd-pleaser, so make it ahead! The assembled cake keeps for 2 days in the fridge, but the ice cream layers will get icy. For best texture, serve within 6 hours of assembly. If you're making it for a party, prepare the cake layers and glaze the day before, then add the ice cream filling just before serving. The glaze sets quickly, so have everything ready to go when you're pouring it. Store leftovers in the freezer for up to 1 month, but let it thaw in the fridge overnight before serving again.
Why You'll Love This Recipe
- No Mixer Needed: I swear by this recipe because it relies on one bowl—just stir the peanut butter into the wet ingredients until smooth. No electric mixer, no sticky cleanup, just a spatula and a few minutes of elbow grease. Honestly, that creamy peanut butter folds right in like butter, making it effortless.
- Reese’s Meets Cake: The combo of warm brown sugar and peanut butter gives it that real Reese’s taste—like a hug in dessert form. The cake layer stays tender (thanks to the ice cream swirl), while the peanut butter frosting adds that signature crunch. Between us, it’s the closest I’ve gotten to a Reese’s cup without the mess.
- Birthday or Breakfast: This cake is that versatile—dress it up with chocolate shavings for a party, or serve it plain with a scoop of vanilla ice cream for a lazy Sunday. I’ve even made mini versions for office potlucks (they disappear fast). The brown sugar crust? Perfect for toasting and dipping, too.
- Leftovers? Better: The cake keeps well for days—moist thanks to the peanut butter, not dry like most boxed cakes. I’ll be real: I’ve reheated slices in the microwave for breakfast (yes, even on a Tuesday night) and no one bats an eye. Plus, the ingredients are cheap—peanut butter and sugar stretch further than you’d think.
Step-by-step instructions for Reese's peanut butter ice cream cake
Here's how to create layers of fudgy peanut butter cake and cool vanilla ice cream magic.
👨🍳 Step 1: Mix the Cake Batter for Fudgy Layers
Preheat your oven to 350°F and grease two 9-inch round cake pans. In a large mixing bowl, combine the 2.5 cups all-purpose flour, 2 tsp baking powder, 0.5 tsp baking soda, and 0.5 tsp salt. Sift this mixture together to remove any lumps and ensure an even texture—this prevents dense spots in your cake.
In a separate bowl, cream together the 1 cup unsalted butter and 2 cups granulated sugar on medium speed until light and fluffy, about 3-4 minutes. Add the 1.5 cups creamy peanut butter and mix until fully combined. This step is crucial—it creates the rich peanut butter flavor that makes this cake special. Beat in the 2 whole large eggs, one at a time, followed by the 2 tsp vanilla extract. Scrape down the sides of the bowl to ensure everything is well incorporated.
🍳 Step 2: Combine Wet and Dry Ingredients
Gradually add the dry ingredients to the wet mixture, mixing on low speed until just combined. Avoid overmixing—you want to see a few streaks of flour remaining. Fold in the 1 cup crushed Reese's pieces by hand using a spatula, ensuring they're evenly distributed throughout the batter. This adds bursts of peanut butter flavor and texture in every bite.
Divide the batter evenly between the two prepared cake pans. Smooth the tops with a spatula and bake for 25-30 minutes, or until a toothpick inserted into the center comes out clean. Let the cakes cool in the pans for 10 minutes before transferring them to a wire rack to cool completely. This cooling step is essential—it prevents the ice cream from melting too quickly when you assemble the cake later.
⏰ Step 3: Assemble the Ice Cream Layers
Once the cakes are completely cool, place one cake layer on a serving plate. Scoop 1.5 cups of the vanilla ice cream evenly over the cake layer, spreading it out to cover the entire surface. Press gently to create a smooth layer—this ensures the ice cream stays in place and doesn't slide off when you slice the cake. Repeat with the second cake layer, adding the remaining 1.5 cups of vanilla ice cream on top.
Place the cake in the freezer for at least 2 hours, or until the ice cream layers are firm. This freezing step is critical—it allows the ice cream to set properly and keeps the cake structure intact. The longer you let it freeze, the more stable the cake will be when you serve it. Trust me, patience here makes all the difference!
🥘 Step 4: Create the Peanut Butter Glaze
In a medium bowl, whip together the 0.5 cup heavy whipping cream and 1 cup powdered sugar until smooth and slightly thickened. Add the 2 tsp vanilla extract and mix until fully combined. This glaze adds a creamy, sweet finish that ties all the flavors together beautifully. If the glaze is too thick, add a splash of milk to reach your desired consistency—it should be pourable but still coat the back of a spoon.
Once the cake is fully frozen, carefully pour the glaze over the top and let it drip down the sides. Sprinkle the 0.25 cup crushed peanuts evenly over the glaze while it's still wet. This adds a delightful crunch and visual appeal. Let the glaze set for 10-15 minutes before slicing. Serve immediately to enjoy the perfect balance of warm peanut butter cake and cool, creamy ice cream.
🍽️ Step 5: Serve and Enjoy
Slice the cake with a warm knife to create clean, even pieces. The warm knife helps prevent the ice cream from melting too quickly, keeping your cake looking beautiful. Serve immediately and watch as your guests are amazed by the layers of fudgy peanut butter cake and cool vanilla ice cream. This cake is a showstopper—perfect for celebrations or just treating yourself to something truly delicious!
Pro Tips For Making Reese'S Peanut Butter Ice Cream Cake
- Whip the peanut butter: DESCRIPTION:
- Measure flour right: DESCRIPTION:
- Don’t overmix the batter: DESCRIPTION:
- Chill the layers: DESCRIPTION:
Storing and reheating this dish
Refrigerator Storage
Store the fully assembled cake in an airtight container with parchment paper between layers to prevent sticking. Keep it in the fridge for up to 2 days, but know the ice cream will soften slightly.
I recommend chilling it for 30 minutes before serving to restore some firmness. The peanut butter glaze stays glossy and delicious, but the cake's texture will be softer than when freshly made. 🥶
Freezer Prep Tips
For longer storage, freeze the unassembled cake layers wrapped tightly in plastic wrap and aluminum foil. They’ll keep for up to 2 months—just thaw at room temperature for 2 hours before adding ice cream.
The ice cream filling must be added fresh after thawing, so plan accordingly. I like to freeze the glaze separately and reheat it slightly before pouring for a smoother finish. ❄️
Reheating Ice Cream Layers
If your cake sits too long and the ice cream melts, don’t panic! Spread 1 cup of softened vanilla ice cream over the cake and refreeze for 1 hour to restore texture.
For extra creaminess, brush melted ice cream over the top and let it set for 20 minutes before serving. This trick works especially well if you’re reheating from the freezer. 🍦
Glaze Refresh
If the glaze looks dry after storage, rewarm it by microwaving for 10-15 seconds or heating in a small saucepan over low heat until smooth. Stir in 1 tsp milk if needed to restore pourability.
Drizzle over the cake just before serving to keep it looking restaurant-fresh. The crushed peanuts will still add crunch even after reheating. 🥜
Serving After Storage
Use a warm knife to slice through the cake, especially if it’s been refrigerated. This prevents the ice cream from melting too quickly and keeps slices clean. Serve immediately after slicing to enjoy the perfect contrast of warm cake and cool cream.
For a party, assemble the cake 2 hours before serving—this gives the ice cream time to firm up slightly without fully freezing. 🎉
Make-Ahead Strategy
Bake the cake layers 1 day ahead and store them wrapped at room temperature. Prepare the glaze and chill it separately. On serving day, assemble the cake with fresh ice cream and let it set for 1 hour before glazing.
This approach ensures the best texture and flavor, with minimal last-minute stress. Trust me, this method saves time without sacrificing quality! ⏰
Nutrition facts
Frequently asked questions
Can I make this cake without Reese's Pieces?
If you don't have Reese's Pieces, you can substitute with 1 cup chopped peanuts or 1 cup mini chocolate chips for a similar texture. For the peanut butter flavor, add 2 extra tablespoons of peanut butter to the batter. The cake will still be delicious—just without the classic candy crunch!
How do I keep the ice cream from melting too quickly?
First, let the cake layers cool completely before adding ice cream. Then, freeze the assembled cake for at least 2 hours before glazing. When serving, use a warm knife to slice through cleanly. For extra stability, chill the cake for 10 minutes before cutting into portions. The longer it stays frozen, the better the texture!
Can I use a different flavor of ice cream?
Yes! While vanilla works perfectly, you can try coffee, mint chip, or even peanut butter ice cream for a bolder flavor. Just be aware that some flavors may melt faster than vanilla. For best results, stick with a premium brand that stays firm at cooler temperatures.
Why did my cake turn out dense instead of fudgy?
Overmixing the batter or using too much flour can make the cake dense. Make sure to sift the dry ingredients and mix just until combined—stop when you see a few flour streaks. Also, don't skip the cooling step; warm cake layers will cause the ice cream to melt too quickly. For extra fudginess, add 2 tablespoons of cocoa powder to the dry ingredients.
How can I make this cake gluten-free?
Replace the all-purpose flour with a 1:1 gluten-free baking flour blend like Bob's Red Mill. Add 1 extra teaspoon of xanthan gum to help bind the cake. You may also need to reduce the peanut butter by 2 tablespoons since gluten-free flours absorb liquid differently. Test the batter consistency and adjust as needed.