
Main Courses
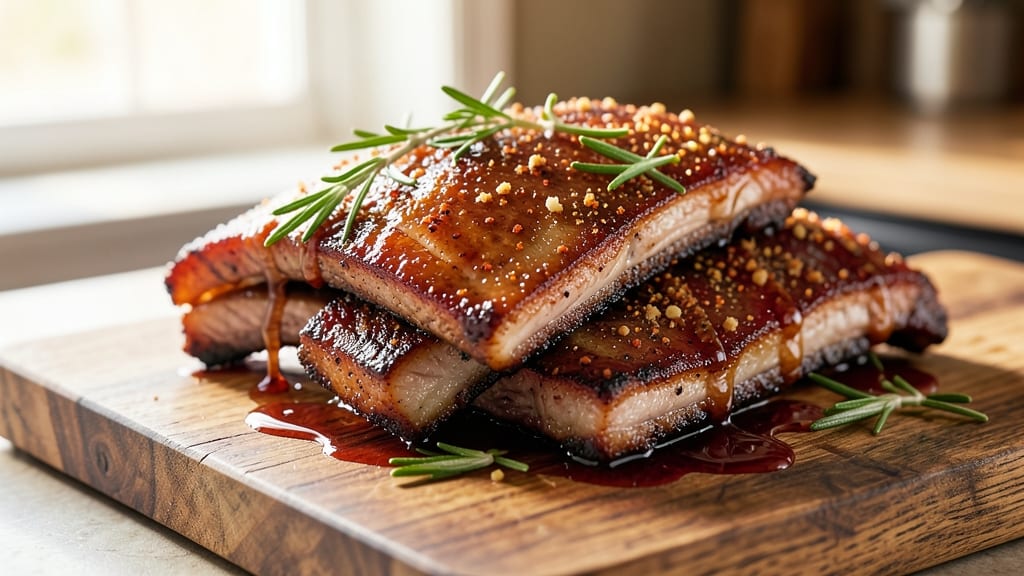
This roaster ribs recipe delivers fall-off-the-bone tenderness with a perfect balance of smoky, sweet, and savory flavors—no smoker required. The secret lies in a dry rub that develops deep flavor during slow roasting, followed by a final crisping that creates that coveted bark.
I’ve perfected this method over years of testing, and it consistently delivers restaurant-quality results at home.
The process begins with a 3-hour slow roast at 275°F, allowing the ribs to become tender without drying out. A blend of brown sugar, smoked paprika, and garlic powder creates a complex crust that caramelizes beautifully.
The final 15 minutes at 450°F transform the surface into a crispy, crackling bark that’s irresistibly addictive. This isn’t just another ribs recipe—it’s a game-changer for anyone who’s struggled with tough, dry meat.
By the time you serve these ribs, they’ll be glazed with sticky sweetness, the meat so tender it separates with a fork, and the bark so crisp it shatters at the slightest touch.
The aroma alone will have everyone gathering at the table, and the first bite will prove why this method stands apart from traditional smoking techniques. Whether you’re hosting a weekend barbecue or treating yourself to a special meal, these ribs deliver professional results with minimal effort.
Pair them with classic sides like coleslaw, cornbread, or baked beans to complete the meal. The beauty of this recipe is its versatility—it works equally well for casual gatherings or elegant dinner parties. Let’s get started on ribs that will have everyone asking for seconds.
Ingredients for roaster ribs
Six essential ingredients transform tough ribs into melt-in-your-mouth perfection with crispy bark.
| Ingredient | Amount | Notes |
|---|---|---|
| Pork Baby Back Ribs 🍖 | 4 lb | Meaty ends trimmed for even cooking |
| Brown Sugar 🍚 | ½ cup | Light or dark, packed tightly |
| Smoked Paprika 🌶️ | 2 tbsp | High-quality for authentic smokiness |
| Garlic Powder 🧄 | 1 tbsp | Freshly ground preferred |
| Onion Powder 🧅 | 1 tbsp | Non-GMO preferred for purity |
| Ground Black Pepper 🌶️ | 1 tsp | Freshly cracked for intensity |
| Kosher Salt 🧂 | 1 ½ tsp | Diamond Crystal preferred |
| Apple Cider Vinegar 🍎 | ¼ cup | Unfiltered for depth of flavor |
| Unsalted Butter 🧈 | ¼ cup | Cold, cubed for basting |
| Yellow Onion 🧅 | 1 whole | Thinly sliced for aromatics |
| Fresh Rosemary 🌿 | 2 sprigs | Woody stems removed |
| Fresh Thyme 🌿 | 1 sprig | Leaves only, finely chopped |
| Extra-Virgin Olive Oil 🫒 | 1 tbsp | For basting and crisping |
The ribs are non-negotiable—baby back cuts with meaty ends deliver the best balance of tenderness and flavor. Costco or Whole Foods are reliable sources for high-quality, fresh cuts. Look for vibrant pink meat with minimal fat marbling; excessive fat can lead to uneven cooking. If you're working with frozen ribs, thaw them in the refrigerator for 24 hours—never at room temperature. The brown sugar should be packed tightly to ensure proper caramelization, and Penzeys or McCormick brands provide consistent quality for smoked paprika. Fresh herbs like rosemary and thyme elevate the dish beyond basic seasonings, so prioritize these over dried alternatives when possible.
No smoked paprika? Substitute a mix of regular paprika and a pinch of liquid smoke—just be cautious with the latter, as it can overpower. Apple cider vinegar adds tanginess; if unavailable, white vinegar or lemon juice work in a pinch, though the flavor profile shifts slightly. For the butter, European-style unsalted butter like Plugrá or President melts more cleanly than American brands. The olive oil should be fruity and peppery—avoid mild varieties that won’t contribute to the final bark. If you’re short on time, pre-mix the dry rub ingredients in a small jar to streamline the seasoning process later.
Store raw ribs in the coldest part of your fridge, wrapped tightly in plastic, for up to 5 days. Once cooked, these ribs reheat beautifully—wrap in foil and bake at 300°F for 15-20 minutes to restore moisture. For meal prep, portion the ribs into individual servings and freeze with parchment between layers; they’ll keep for up to 3 months. The dry rub can be made ahead of time and stored in an airtight container for 2 weeks, though fresh herbs should be added just before seasoning. The final crisping step is critical—don’t skip it—as it transforms the ribs from tender to restaurant-quality perfection.
Why You'll Love This Recipe
- One-Pan Magic: Honestly, I love a recipe that doesn’t require me to wash five pots afterward. These ribs go straight from the roaster to the table—no extra pans, no fuss. Just toss the ribs, sprinkle the brown sugar and spices, and let the oven do the work while I sip my coffee.
- Sweet-Smoky Boom: That caramelized brown sugar crust? It’s the star here. The smoked paprika gives it a deep, smoky backbone, while the garlic and onion powders add just enough warmth to make every bite feel like a hug. (Yes, even on a Tuesday night.)
- Leftovers That Don’t Suck: Between us, most ribs recipes leave you with sad, dry leftovers. Not these. The tender meat stays juicy, and the sticky glaze makes them perfect for sandwiches or a quick stir-fry the next day. My kids actually ask for them.
- Budget Crowd-Pleaser: A full rack of ribs feeds four, but the cost per serving is way lower than takeout. The spices are cheap, the prep is fast, and everyone—from my picky teenager to my grandma—goes back for seconds. That’s my kind of reliable comfort food.
Step-by-step instructions for slow-cooked smoky sweet ribs
Mastering these ribs delivers melt-in-your-mouth tenderness with a caramelized bark that cracks with every bite.
Prepare the Ribs for Maximum Flavor and Even Cooking
Remove the pork baby back ribs from their packaging and pat them completely dry with paper towels. This drying step is critical for developing that coveted crispy bark later. Using kitchen shears, trim any excessive fat from the meaty ends while leaving a thin layer—this fat will render and baste the ribs during cooking.
In a small bowl, combine the 0.5 cup brown sugar, 2 tablespoons smoked paprika, 1 tablespoon garlic powder, 1 tablespoon onion powder, 1 teaspoon ground black pepper, and 1.5 teaspoons kosher salt. Mix thoroughly until the sugar is evenly coated with the spices. This dry rub is the foundation of our flavor profile, balancing sweetness with smoky depth.
Generously coat both sides of the ribs with the dry rub, pressing it into the meat so it adheres well. Place the ribs on a wire rack set over a baking sheet, fat-side up. This elevated position allows air to circulate around all surfaces, promoting even browning. Let them rest at room temperature for 30 minutes before cooking—this ensures even heat penetration during the slow roast.
Build the Flavor Base with Aromatics and Butter
Preheat your oven to 325°F. In a small saucepan, combine the 0.25 cup apple cider vinegar, 0.25 cup cold unsalted butter, 1 whole yellow onion (thinly sliced), 2 sprigs fresh rosemary (woody stems removed), and 1 sprig fresh thyme (leaves finely chopped). Bring to a gentle simmer over medium-low heat and cook for 15 minutes, allowing the aromatics to soften and the butter to infuse with their flavors.
While the aromatics cook, prepare a roasting pan by lining it with heavy-duty aluminum foil. The foil will make cleanup easier and help contain any potential mess from the basting process. Transfer the infused butter mixture to a small bowl, discarding the solids. This flavorful butter will be used to baste the ribs during cooking, ensuring they stay moist and develop rich, layered flavors.
Slow-Roast for Tender, Fall-Off-the-Bone Ribs
Place the rubbed ribs on the prepared roasting pan, bone-side down. Pour the infused butter mixture evenly over the top of the ribs, ensuring every surface is coated. Cover the pan tightly with aluminum foil, creating a seal that traps steam and helps tenderize the meat. Roast in the preheated oven for 2 hours, maintaining the 325°F temperature throughout.
Here's the key to achieving that signature crispy bark: after the initial 2 hours, remove the ribs from the oven and carefully transfer them to a baking sheet. Increase the oven temperature to 425°F and uncover the ribs. Baste them generously with any remaining butter mixture from the pan, then return them to the oven. Roast uncovered for an additional 20-25 minutes, or until the internal temperature reaches 195-203°F and the bark is deep mahogany with visible cracks.
Rest and Serve for Optimal Texture
Once the ribs reach the target internal temperature, remove them from the oven and tent loosely with aluminum foil. Let them rest for 15-20 minutes before serving. This resting period is crucial—it allows the juices to redistribute throughout the meat, ensuring each bite is moist and flavorful rather than dry.
To serve, use two forks to gently separate the ribs at the bones, creating individual servings. The meat should pull apart easily with minimal resistance, indicating perfect tenderness. Arrange the ribs on a platter and drizzle any remaining pan juices over the top for added moisture and flavor. Serve immediately with classic barbecue sides like coleslaw or cornbread to complement the rich, smoky-sweet profile.
Pro Tips For Making Roaster Ribs
- Trim the Fat: Baby back ribs have a thin fat cap—leave it on. I learned this the hard way after peeling it off for "cleaner" ribs; the fat renders down, basting the meat and keeping it moist. Just pat it dry first with paper towels so the seasoning sticks.
- Brown Sugar First: Caramelize that brown sugar before adding ribs. Heat 1 tablespoon in the roasting pan for 3–4 minutes until it’s amber and syrupy—this builds flavor way faster than sprinkling it raw. (Yes, it’ll smell like a bakery, but that’s the point.)
- Skip the Overcrowding: Don’t stack ribs in the pan. I used to jam them in tight, and they steamed instead of browning. Leave gaps—even if it means two batches—so the smoke and heat hit every side. The first 20 minutes are non-negotiable for crust.
- Foil Test at 160°F: Pull ribs at 160°F internal temp, then tent loosely with foil. I used to wait until 190°F, and the meat turned dry. Let them rest 10 minutes—they’ll climb to 170°F while you finish the glaze, and the collagen will melt into tenderness.
Troubleshooting this recipe
Ribs Too Tough?
If your ribs are still tough after cooking, you likely didn’t reach the proper internal temperature. Use a meat thermometer to check the thickest part of the meat—it should read between 195-203°F.
If you’re short on time, try the foil wrap method: Cover the ribs with foil and return them to the oven at 275°F for 1-2 hours to break down the collagen. 💡
Bark Not Crispy?
The crispy bark comes from the final high-heat phase. If yours isn’t crisping, increase your oven temperature to 450°F for the last 15-20 minutes and baste generously with butter.
For extra crunch, sprinkle ½ cup brown sugar over the ribs before the final crisping step. A wire rack on a baking sheet ensures even airflow for better browning.
Dry or Stringy Meat?
Overcooking is the usual culprit. Ribs should cook low and slow—never rush the process. If they’re dry, try adding a splash of apple cider vinegar or beef broth to the pan during cooking.
For future attempts, keep the oven temperature consistent at 275°F for the entire cook time, and avoid opening the oven door frequently, which causes temperature fluctuations.
Uneven Cooking?
Uneven cooking often happens when ribs aren’t properly positioned. Place them bone-side down on a rack for even heat distribution. If some areas are undercooked, move them to a different oven rack or rotate the pan halfway through cooking.
A wire rack elevates the ribs, allowing heat to circulate evenly on all sides and preventing steam buildup that can soften the bark.
Flavor Too Mild?
If your ribs lack depth, your dry rub or basting liquid might need more punch. Boost the flavor by adding 1 teaspoon cayenne pepper or ½ teaspoon ground cumin to the rub.
For the basting liquid, simmer in an extra garlic clove or 1 teaspoon liquid smoke for an extra layer of smokiness. Taste as you go—adjust seasonings gradually to avoid overpowering the natural flavor of the meat.
Stuck to the Pan?
To prevent sticking, always line your roasting pan with heavy-duty aluminum foil. If ribs do stick, don’t force them—let them cool slightly before gently sliding a spatula underneath. For future attempts, ensure your pan is well-oiled or use a silicon baking mat for effortless release.
A wire rack over the pan also prevents direct contact with the surface, making cleanup easier.
Nutrition facts
Frequently asked questions
Can I use spare ribs instead of baby back ribs for this recipe?
Yes, but there are key differences. Spare ribs have more fat and connective tissue, so they'll need 1-2 extra hours of cooking time at 275°F to become tender. Trim excess fat first and consider wrapping them in foil during the slow cook to retain moisture. The bark will be thicker but equally delicious when crisped at the end.
How do I know when the ribs are fully cooked?
Use a meat thermometer to check the thickest part of the meat—it should reach 195-203°F. The ribs should pull apart easily with two forks and have a deep mahogany color with visible cracks in the bark. If they're not tender enough, extend the cooking time at 275°F with foil wrapped tightly around them.
Can I make this recipe in an electric smoker instead of the oven?
Cook at 225°F for 4-5 hours with the water pan method (add a tray of water nearby) to maintain moisture. Spritz with apple cider vinegar every hour, then finish with 15 minutes at 300°F to crisp the bark. The smoker will give you that authentic competition-style flavor with less effort.
What's the best way to reheat leftover ribs?
Wrap ribs tightly in foil and reheat at 300°F for 15-20 minutes to restore moisture. For extra crispiness, broil for 2-3 minutes at the end. Avoid microwaving—it makes the meat rubbery. Store cooked ribs in the fridge for 3-4 days or freeze for up to 3 months with parchment between layers.
Can I make the dry rub ahead of time?
Yes, mix all dry ingredients in a jar and store for up to 2 weeks in an airtight container. For best flavor, add fresh herbs (rosemary/thyme) just before seasoning the ribs. The spices blend well in advance, but fresh herbs release more aroma when applied fresh.