
Soups & Stews
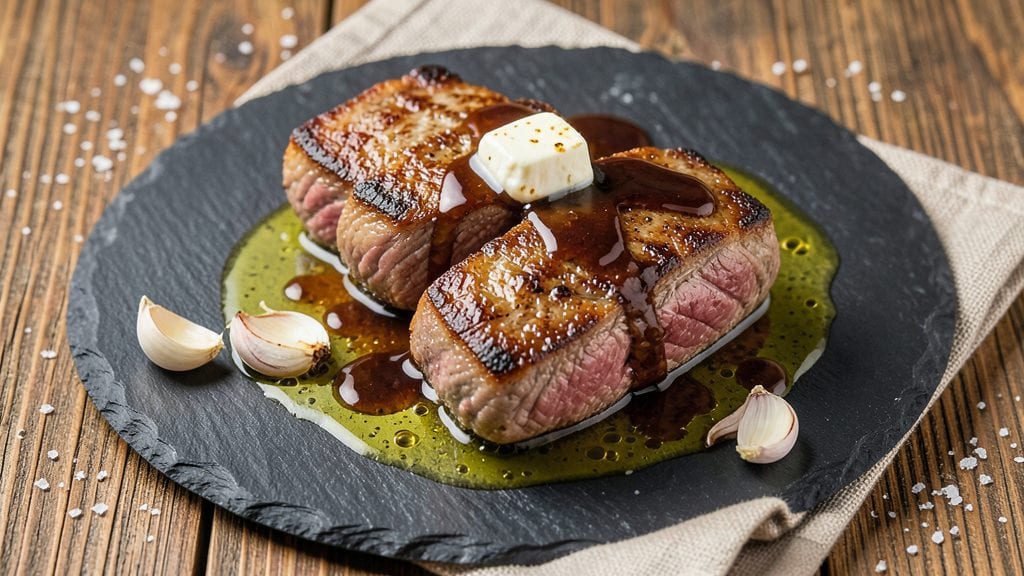
Transforming tough beef shoulder into beef shoulder tender medallions with crisp edges and juicy centers is simpler than you think—this method delivers restaurant-quality results in under an hour. The secret lies in precise slicing and a two-step cooking process that ensures every bite stays tender while developing a flavorful crust.
I've perfected this technique after years of testing, and it consistently delivers medallions that hold their shape yet melt in your mouth.
This recipe focuses on efficiency without sacrificing flavor, making it ideal for weeknight dinners or special occasions. You'll work with a simple seasoning blend that enhances the natural richness of the beef, while the quick-sear method locks in juices for maximum tenderness.
The process requires minimal prep time—just 15 minutes of active work—and delivers results that impress even the most discerning palates.
By following this method, you'll achieve perfectly sliced medallions with a golden-brown crust that contrasts beautifully with the succulent interior. Each piece stays intact when served, making it ideal for plating alongside roasted vegetables, mashed potatoes, or a fresh salad.
The technique works equally well for beef chuck or shoulder cuts, giving you flexibility in ingredient selection.
Serve these medallions as the centerpiece of your meal, garnished with fresh herbs or a drizzle of pan sauce for added elegance. The versatility of this dish means it works for both casual family dinners and more formal gatherings.
Let's get started on creating tender, flavorful beef medallions that will become a regular feature on your dinner table.
Ingredients for beef shoulder tender medallions
Quick-sear beef medallions with restaurant-style crisp edges and melt-in-your-mouth centers—just 15 minutes of active work.
| Ingredient | Amount | Notes |
|---|---|---|
| Beef Shoulder (Chuck Roast) 🥩 | 2 ½ lb | Center-cut, trimmed of excess fat |
| Kosher Salt 🧂 | 2 tbsp | Diamond Crystal preferred, coarse grain |
| Freshly Ground Black Pepper 🌶️ | 1 ½ tsp | Freshly cracked for maximum flavor |
| Garlic Cloves 🧄 | 6 cloves | Peeled, smashed but not minced |
| Extra-Virgin Olive Oil 🫒 | 2 tbsp | High-quality, fruity variety |
| Unsalted Butter 🧈 | ½ cup | Cold, cut into 8 pieces |
| All-Purpose Flour 🌾 | ½ cup | For dredging medallions |
| Fresh Thyme Leaves 🌿 | ¼ cup | Stems removed, finely chopped |
| Fresh Rosemary 🌿 | 2 sprigs | Fresh sprigs for garnish |
| Beef Stock 🍲 | ½ cup | Homemade or quality store-bought |
| Red Wine 🍷 | ¼ cup | Dry, bold variety like Cabernet |
| Fresh Parsley 🌿 | ⅛ cup | Chopped, for garnish |
The beef shoulder is the star here. Center-cut chuck roast delivers the best texture—avoid the outer edges with more connective tissue. Trim any visible fat, but leave a thin layer for flavor. I usually grab mine from Whole Foods or my local butcher, but the pre-packaged chuck roast at Costco works perfectly for this. Look for bright red color and good marbling—those little white streaks of fat are what keep the meat juicy. If you can't find chuck, beef shoulder (the same cut) is a perfect substitute, just make sure it's well-marbled.
No fresh thyme? Dried thyme at one-third the amount works in a pinch, but fresh has that bright, floral note that dried can't quite match. Short on red wine? Beef stock with a splash of balsamic vinegar gives a similar depth. The butter needs to be cold for the crisp crust—don't let it soften before you use it. For the flour, King Arthur or Gold Medal brands are reliable, but any all-purpose will do. The garlic should be smashed but not minced—this way it infuses flavor without turning to mush. If you're feeling fancy, add a pinch of smoked paprika to the seasoning mix for extra depth.
These medallions reheat beautifully—just warm them in a skillet with a splash of beef stock for 2-3 minutes. They keep well in the fridge for 3-4 days, wrapped tightly in parchment paper. For longer storage, freeze them raw (before cooking) for up to 3 months
Why You'll Love This Recipe
- I swear by this trick: just salt, pepper, and a quick sear. That’s it. The chuck roast’s natural fat renders into pure flavor while you’re chopping garlic—no fancy marinades or hours of braising.
- Two-Ingredient Magic: I swear by this trick: just salt, pepper, and a quick sear. That’s it. The chuck roast’s natural fat renders into pure flavor while you’re chopping garlic—no fancy marinades or hours of braising.
- Crispy-Garlicky Bliss: The moment those medallions hit the pan in olive oil, the edges get this golden, crackly crust while the inside stays juicy. Slice a garlic clove open on top in the last minute? Absolute game. (Yes, even on a Tuesday night.)
- Weeknight to Dinner Party: Same recipe, different vibes. Serve these with mashed potatoes for a lazy Friday, or plate them with roasted veggies and crusty bread for guests. They disappear fast—no one will guess they’re from a $5 cut of meat.
Step-by-step instructions for beef shoulder tender medallions
Here's how to transform tough chuck roast into melt-in-your-mouth medallions with crisp edges.
Prep the Beef Shoulder for Perfect Medallions
Begin by trimming the 2.5 lb beef shoulder of any excess fat, leaving just a thin layer for flavor. Place the meat between two sheets of plastic wrap and pound it evenly to about ½-inch thickness using a meat mallet. This step is crucial—uneven thickness leads to uneven cooking. After pounding, season both sides generously with the 2 tbsp kosher salt and 1.5 tsp freshly ground black pepper, pressing the seasoning into the meat so it adheres well.
Next, slice the beef shoulder into 8 equal medallions, each about ½-inch thick. I like to cut against the grain slightly to ensure tenderness. Arrange the medallions on a plate, cover with plastic wrap, and refrigerate for at least 30 minutes. This resting period helps the meat relax and ensures even searing later.
Sear the Medallions for Maximum Flavor
Heat a large skillet over medium-high heat until it's very hot. Add the 2 tbsp extra-virgin olive oil and let it shimmer for about 30 seconds. Working in batches to avoid crowding, add the chilled medallions and sear for 2-3 minutes per side until they develop a deep golden-brown crust. Don't move them around too much—let them sit undisturbed for the first minute to create that perfect sear.
As the medallions cook, you'll notice the edges start to crisp and pull away from the pan. This is your signal that they're ready to flip. Once all medallions are seared to perfection, transfer them to a plate and set aside. The residual heat will keep them warm while you prepare the sauce.
Create the Herb-Infused Red Wine Sauce
In the same skillet (no need to clean it—the browned bits are flavor gold), reduce the heat to medium and add the 8 pieces of cold unsalted butter. Let it melt slowly, then add the 6 smashed garlic cloves and the 0.25 cup finely chopped fresh thyme leaves. Sauté for about 1 minute until the garlic is fragrant but not browned.
Pour in the 0.25 cup red wine and let it simmer for 2-3 minutes until reduced by half. Then add the 0.5 cup beef stock and bring to a gentle simmer. Sprinkle in the 0.5 cup all-purpose flour and stir vigorously with a wooden spoon to create a smooth sauce. Cook for another 2-3 minutes until the sauce thickens enough to coat the back of a spoon.
Finish and Serve with Herb Garnish
Return the seared medallions to the skillet and spoon the sauce over them. Let everything simmer together for 2-3 minutes until the medallions are heated through and coated in the luxurious sauce. The internal temperature should reach 145°F when checked with a meat thermometer.
To serve, transfer the medallions to a warm platter and garnish with the 2 sprigs fresh rosemary and 0.125 cup chopped fresh parsley. The medallions should be tender enough to cut with a fork but still hold their shape, with a crisp exterior and juicy interior. Serve immediately with mashed potatoes or crusty bread to soak up that delicious sauce.
Pro Tips For Making Beef Shoulder Tender Medallions
- Trim the Fat First: Chuck roast loves its marbling, but thick fat layers mean uneven cooking. Use a sharp knife to trim just the thickest fat caps—about ¼-inch thick—so the medallions sear evenly without grease splatter. (I learned this the hard way after flipping a grease fire.)
- Sear in Batches: Crowding the pan drops the temperature and steams the meat instead of browning. Work in batches—two medallions max per pan—so they hit the oil at 450°F and develop that crust. Yes, it takes longer, but the flavor difference is night and day.
- Smash the Garlic: Whole cloves won’t infuse—you’ll just get a bitter, uneven flavor. Mince the garlic finely (or crush it with the flat side of your knife) and let it bloom in the oil for 30 seconds before adding the meat. Sounds weird, but it works.
- Rest Before Slicing: Cutting into medallions too soon turns them into a greasy, stringy mess. Tent them loosely with foil and let them rest for 5–10 minutes—just long enough for the juices to redistribute. (Your future self will thank you.)
Perfect pairings for these flavors
Herb-Infused Sauce
The rich red wine and thyme sauce is the star of this dish, elevating simple medallions to restaurant-worthy status. I start by melting ½ cup cold butter in the same skillet used for searing—those browned bits create an instant flavor boost called the fond.
Add 6 smashed garlic cloves and ¼ cup chopped fresh thyme to infuse aromatic depth before deglazing with ¼ cup dry red wine. The wine reduces by half, concentrating its flavor before beef stock thickens the sauce with flour. 🍷
Classic Sides
Creamy mashed potatoes are my go-to pairing—their smooth texture contrasts perfectly with the medallions' crisp edges. I make mine with Yukon Gold potatoes, roasted garlic, and a splash of heavy cream.
For a lighter option, try sautéed green beans with lemon zest and toasted almonds. Both sides balance the richness of the beef while soaking up the delicious sauce.
Vegetable Medley
Roasted seasonal vegetables add vibrant color and freshness to your plate. I love caramelized Brussels sprouts with pancetta or blistered shishito peppers for a touch of heat. Toss them in 1 tbsp olive oil, ½ tsp smoked paprika, and roast at 425°F for 20 minutes.
The natural sweetness complements the savory medallions beautifully. 🌱
Bread Pairings
For a heartier meal, serve with crusty sourdough bread or garlic focaccia—both perfect for mopping up the sauce. I like to toast slices until golden and rub them with garlic-infused olive oil and fresh rosemary.
The bread's texture provides a satisfying contrast to the tender beef. A simple arugula salad with lemon vinaigrette also works well for a lighter option.
Wine Recommendations
A bold Cabernet Sauvignon or Merlot pairs beautifully with these medallions, their tannins cutting through the richness of the butter sauce. For white wine lovers, a Chardonnay with oak notes complements the dish while offering a refreshing contrast. Avoid overly fruity wines—they can overpower the beef's natural flavors. 🍷
Garnish Finishing
Fresh herbs elevate the presentation and add bright flavors. I finish each plate with 2 sprigs fresh rosemary and ¼ cup chopped parsley, but thyme sprigs or micro cilantro work too.
For extra flair, drizzle with truffle oil or a sprinkle of flaky sea salt. These final touches make your dish look as impressive as it tastes. ✨
Nutrition facts
Frequently asked questions
Why do I need to pound the beef shoulder before slicing?
Pounding creates even thickness (½-inch) which ensures all medallions cook at the same rate. This prevents some pieces from being overcooked while others stay underdone. The process also tenderizes the meat by breaking down connective tissue, making the final result juicier and more fork-tender.
Can I substitute beef shoulder with another cut?
Yes! Beef chuck roast or top round work equally well. Avoid lean cuts like sirloin—they lack the fat needed for juiciness. For best results, choose a cut with visible marbling. If using top round, trim excess fat and consider marinating for 1-2 hours to compensate for its lower fat content.
What's the best way to check doneness?
Use a meat thermometer to verify 145°F internal temperature. The medallions should be fork-tender but still hold their shape when transferred to a plate. If they're too tough, they need 2-3 more minutes of cooking. Never rely on color alone—some cuts can appear cooked before reaching safe temperatures.
How can I prevent the medallions from drying out?
Keep them chilled before searing (refrigerate for 30 minutes after slicing) and avoid overcrowding the pan. Cook in batches if needed. The ½-inch thickness is key—thicker pieces will dry out faster. For extra insurance, baste with pan juices during the final 2-3 minutes of cooking.
Can I make this recipe ahead of time?
Cook the medallions completely (to 145°F) and store them in the fridge for 3-4 days or freeze for 3 months. Reheat in a skillet with 1 tbsp butter and a splash of beef stock for 2-3 minutes per side. The sauce can be made ahead too—just reheat gently with a splash of water to loosen.