
Snacks
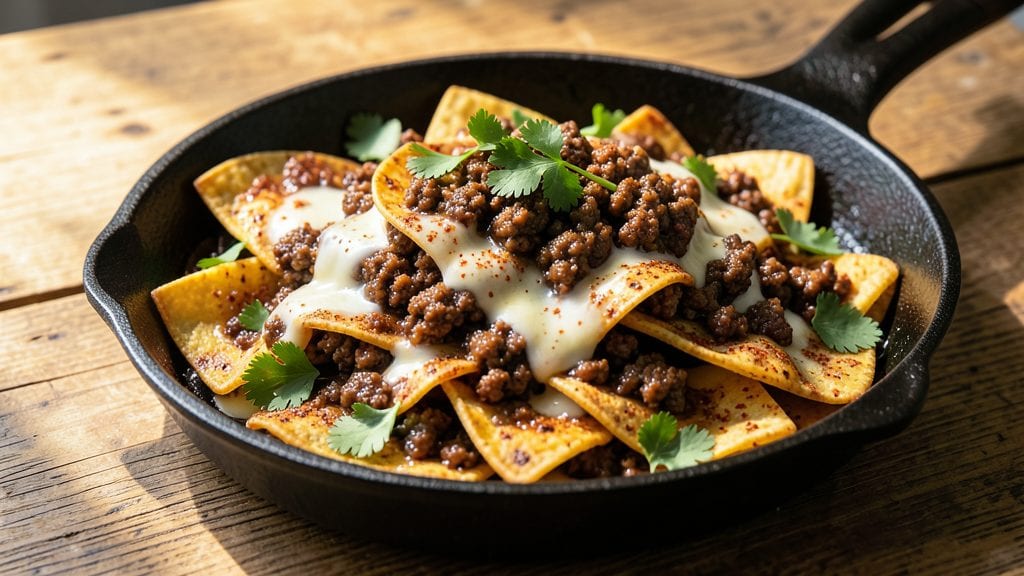
This taquito bake recipe delivers the perfect balance of crispy corn shells and flavorful spiced beef filling that transforms a simple snack into a crowd-pleasing centerpiece.
I developed this version after years of testing—because nothing beats the satisfying crunch of golden shells paired with savory, seasoned meat that melts in your mouth. The secret lies in properly pre-cooking the filling and baking the taquitos just until they're golden and crisp, not soggy.
The beauty of this recipe is its versatility—you can use ground beef, chicken, or even a plant-based crumble for the filling, all while keeping the same crispy shell texture.
With just 15 minutes of prep and 20 minutes in the oven, you'll have a dish that's perfect for game day, parties, or a quick weeknight dinner.
The spices in the filling (cumin, chili powder, garlic) create a depth of flavor that pairs perfectly with the natural sweetness of the corn shells.
What you'll end up with is a crispy golden bake where each taquito is perfectly stuffed and holds its shape, delivering that satisfying crunch with every bite.
The cheese inside melts just enough to create a creamy contrast to the crispy shell, while the spices in the meat add warmth and complexity. This isn't just a snack—it's a dish that brings people together, whether you're serving it at a gathering or enjoying it as a satisfying meal.
Serve with your favorite dipping sauces like salsa, queso, or guacamole for the full experience. The leftovers reheat beautifully too, making this a great make-ahead option for busy days. Here's everything you need to create this foolproof taquito bake that's sure to become a family favorite.
Ingredients for taquito bake
Crispy shells, spiced beef, and melty cheese—this taquito bake packs all the party vibes with minimal effort.
| Ingredient | Amount | Notes |
|---|---|---|
| Ground Beef (80/20) 🥩 | 1 ¼ lb | Cooked and drained well |
| Corn Taquitos (hard shells) 🌽 | 24 whole | Standard 2-inch size |
| Shredded Monterey Jack Cheese 🧀 | 2 cups | Freshly shredded preferred |
| Chili Powder 🌶️ | 1 tbsp | Medium heat preferred |
| Ground Cumin 🌿 | 1 tsp | Toasted for deeper flavor |
| Garlic Powder 🧄 | 1 tsp | Freshly ground preferred |
| Onion Powder 🧅 | 1 tsp | No added MSG |
| Salt 🧂 | ½ tsp | Kosher or sea salt |
| Black Pepper 🌶️ | ½ tsp | Freshly ground preferred |
| Olive Oil 🫒 | 1 tbsp | For brushing shells |
| Large Eggs 🥚 | 1 whole | Beaten for egg wash |
| All-Purpose Flour 🌾 | 2 tbsp | For extra crispiness |
| Sour Cream 🥛 | ¼ cup | Full-fat for creaminess |
| Salsa Verde 🍅 | ½ cup | For serving (optional) |
The beef is non-negotiable here—80/20 ground chuck gives you that perfect fat-to-lean ratio for juicy filling. Walmart or Costco usually have it pre-ground, but if you're buying a block, pat it dry before cooking to avoid soggy shells. I always drain it really well—no one wants a watery taquito. For the shells, Mission brand (the hard ones) are my go-to—they hold up best to baking. If you can't find them, La Choy works too, but they're a tad softer. The cheese? Freshly shredded Monterey Jack melts like a dream, but pre-shredded is fine in a pinch—just pulse it in your food processor to break up the anti-caking agents.
No chili powder? Substitute with smoked paprika plus a pinch of cayenne for heat. Running low on cumin? Ground coriander at the same amount works in a bind. The spices are where the magic happens—don't skip the garlic powder, even if you think it's redundant. For extra crispiness, mix the flour into the egg wash (that's the secret to restaurant-style crunch). The sour cream in the filling keeps things creamy without making the shells soggy—full-fat is worth it here. And if you're serving a crowd, double the batch—these disappear fast.
Prep ahead like a boss: Cook the filling and stuff the taquitos up to 24 hours ahead, then freeze them on a baking sheet before transferring to a bag. Bake straight from frozen—just add 5-7 extra minutes to the time. Leftovers? 350°F oven for 5-7 minutes revives them perfectly. Store uncooked stuffed taquitos in the fridge for 2 days or freeze for 2 months. Pro tip: Line your baking sheet with parchment and bake in batches if your oven isn't huge—crowding kills crispiness.
Why You'll Love This Recipe
- Here’s what sold me: the cumin and chili powder baked right into the beef until it’s deep, not just dusted on top. That fat from the 80/20 beef? It melts into the cheese and caramelizes—crispy edges, gooey middle, every bite’s a win.
- One-Pan Magic: I swear by this recipe when I’m too tired to scrub a million dishes—just brown the beef, stuff those taquitos, and bake. That’s it. The hard shells hold up perfectly, no soggy corners in sight.
- Spice That Sticks: Here’s what sold me: the cumin and chili powder baked right into the beef until it’s deep, not just dusted on top. That fat from the 80/20 beef? It melts into the cheese and caramelizes—crispy edges, gooey middle, every bite’s a win.
- Game for Any Gathering: Between us, this is my go-to for game day, book club, or even a lazy Sunday. Double the batch, freeze half, and boom—you’ve got a crowd-pleaser that doesn’t scream “I spent all day cooking.” (Yes, even on a Tuesday night.)
Step-by-step instructions for crispy taquitos bake
Here's how to create perfectly crispy corn shells stuffed with flavorful beef every time.
Cook and Season the Ground Beef
In a large skillet, heat the 1 tablespoon olive oil over medium-high heat until shimmering. Add the 1.25 lb ground beef (80/20) and cook, breaking it apart with a wooden spoon, until it loses its raw color and begins to brown. This should take about 5-6 minutes. The beef should be fully cooked through with no pink remaining.
Reduce heat to medium and stir in the 1 tablespoon chili powder, 1 teaspoon ground cumin, 1 teaspoon garlic powder, 1 teaspoon onion powder, 0.5 teaspoon salt, and 0.5 teaspoon black pepper. Cook for another 2-3 minutes until the spices are fragrant and the beef has absorbed all the flavors. Drain any excess fat but leave about 1 tablespoon in the pan for moisture.
Prepare the Taquitos Mixture
Transfer the cooked beef to a large bowl and let it cool slightly. Add the 2 tablespoons all-purpose flour, 0.25 cup sour cream, and mix until everything is well combined. The mixture should be moist but not soupy—if it's too dry, add 1 tablespoon water to help bind it. This step ensures the filling stays cohesive when stuffed into the corn shells.
Crack the 1 whole large egg into a separate shallow bowl and beat it lightly with a fork. This will be used to help seal the taquitos and create that golden crust. Keep both the filling and egg wash at room temperature for best results.
Assemble and Bake the Taquitos
Preheat your oven to 425°F and line a large baking sheet with parchment paper. Brush each of the 24 corn taquito shells lightly with the 1 tablespoon olive oil on both sides—this helps crisp them up beautifully. Fill each shell about ¾ full with the beef mixture, pressing gently to compact it.
Dip the filled edge of each taquito into the beaten egg, then press it firmly to seal. Arrange them on the prepared baking sheet in a single layer, leaving about ½ inch of space between each one. This prevents them from steaming and ensures even browning. Bake for 12-15 minutes until the shells are golden brown and crispy.
Add Cheese and Finish Baking
Remove the taquitos from the oven and sprinkle 1 cup shredded Monterey Jack cheese evenly over the top. Return them to the oven for an additional 2-3 minutes just until the cheese melts and begins to bubble. Watch closely to avoid over-browning.
Let the taquitos rest for 5 minutes before serving. This resting time allows the cheese to set slightly and makes them easier to handle. Serve warm with the 0.5 cup salsa verde on the side for dipping—each bite should deliver crispy corn shells, flavorful beef, and melted cheese in perfect harmony.
Optional Crispy Topping (For Extra Crunch)
For an extra-crispy finish, return the baked taquitos to the oven for 1-2 minutes after adding the cheese, or until the cheese is fully melted and the shells are deeply golden. You can also sprinkle an additional ½ cup shredded cheese on top during this final step for maximum cheesiness.
This method guarantees taquitos that are crispy on the outside while staying tender and flavorful on the inside—just like your favorite restaurant version, but made at home with ease.
Pro Tips For Making Taquito Bake
- CRANK THE HEAT FIRST: The taquito shells need a screaming-hot oven to crisp properly—425°F for the first 10 minutes, no excuses. I used to bake them at 375°F and ended up with sad, limp shells that soaked up sauce like a sponge.
- DON’T SKIP THE BEER BATH: Mix ¼ cup beer (or broth) into your ground beef before cooking—it keeps the meat juicy while the spices stick better. After burning through three dry batches, I finally realized the fat needs moisture to render, not just heat.
- BRINE THE SHELLS: Toss the corn taquitos in warm water for 5 minutes before baking—just long enough to plump them up. Dry them thoroughly afterward, or they’ll steam instead of crisp. (Yes, even if you’re impatient like me.)
- LAYER CHEESE LAST: Sprinkle the Monterey Jack on top after the first 10 minutes of baking, not before. The initial blast of heat sets the shells, so the cheese melts into a gooey blanket instead of turning into a gluey mess. Trust the process—your future self will thank you.
Essential equipment for this recipe
Must-Have Baking Tools
First up, you'll need a heavy-duty baking sheet—I recommend half-sheet pans (18x13 inches) from Wilton or USA Pan. These handle high heat better than flimsy cookie sheets and distribute heat evenly for perfect golden-brown shells.
Line it with parchment paper (not foil!) to prevent sticking—Reynolds Non-Stick Parchment is my go-to because it grips well even when hot. 🔥
Shell Prep Essentials
For crispy shells, a pastry brush (like OXO Good Grips) helps spread olive oil evenly on both sides of each taquito before baking. I also keep a small bowl (6-8 oz) for the egg wash—it needs to be shallow so you can dip just the edges without overloading.
A fork or small offset spatula works best for sealing the edges after dipping.
Cheese Handling Gear
Freshly shredded cheese makes all the difference, so invest in a box grater (like the Microplane) to avoid the clumpy texture of pre-shredded cheese. For portioning, a small scoop (about 2 tbsp capacity) ensures even cheese distribution.
I also keep a fine-mesh strainer handy to drain any excess moisture from the cheese before sprinkling.
Temperature Control
An oven thermometer (like Thermoworks Oven Thermometer) is a game-changer—many home ovens run hot or cold, and baking taquitos at 425°F requires precision. Place it near the center rack while preheating to confirm accuracy.
If your oven lacks even heat, rotate the baking sheet halfway through for uniform browning. 🌡️
Assembly Tools
For stuffing, I use a small spoon (like a melon baller) to pack the filling tightly into shells without tearing them. A toothpick comes in handy for poking holes in the shells before baking (if they're too thick) to prevent steam buildup.
Keep a small plate nearby to hold the egg wash—it should be at room temperature for best sealing.
Optional Upgrades
For extra crispiness, a handheld kitchen torch (like Blodgett) lets you torch the shells for 30 seconds after baking for a restaurant-style finish. If you're making these often, a taquito press (like Mexican Taquito Maker) saves time, though it's not essential.
A digital scale (for weighing meat precisely) ensures consistent results every time. 💡
Nutrition facts
Frequently asked questions
Can I use chicken or pork instead of beef in this recipe?
Ground chicken works beautifully—just reduce the cooking time slightly to avoid drying it out. For pork, use 80/20 ground pork shoulder and cook it until fully done (165°F internal temp). The spices and sour cream will still create that perfect creamy texture, but pork adds a slightly richer flavor.
Why are my taquitos soggy instead of crispy?
Soggy shells usually mean one of two things: either the filling is too wet (drain the meat well and adjust the sour cream ratio) or the oven wasn't hot enough. Preheat for 10-15 minutes and use 425°F—no exceptions! Also, avoid overcrowding on the baking sheet and pat shells dry before stuffing.
How do I make this recipe vegetarian?
Swap the beef for 1.25 lb crumbled tempeh or extra-firm tofu (pressed and drained for 30 minutes). Sauté with the same spices, then mix in 2 tbsp nutritional yeast for a cheesy flavor. Add 1 tbsp cornstarch to the filling to help bind it. The texture will be slightly different but still delicious!
Can I bake these ahead of time for a party?
Yes! Assemble the stuffed taquitos, wrap them tightly in plastic, and refrigerate for up to 24 hours or freeze for 2 months. Bake from frozen by adding 5-7 extra minutes at 425°F. For a party, bake them just before serving—they'll stay crispy for 1 hour at room temperature if kept covered.
What's the best way to reheat leftovers?
For maximum crispiness, place leftovers on a baking sheet and reheat at 375°F for 5-7 minutes until golden. Microwaving works in a pinch (use 20-second bursts on medium power), but they'll lose some crunch. Store cooked taquitos in an airtight container with parchment between layers to maintain crispness.