
Main Courses
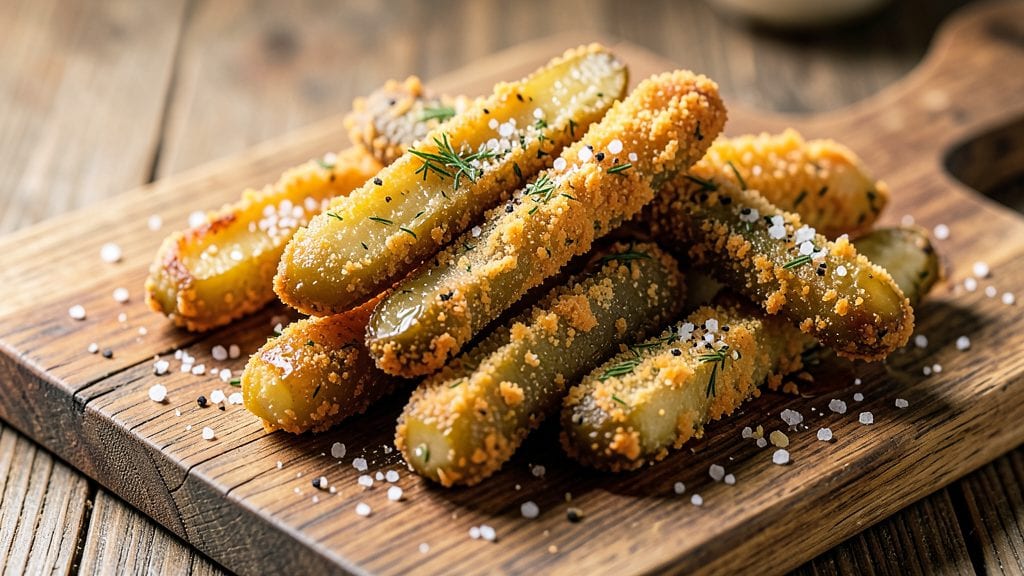
Making Longhorn Steakhouse-style fried pickles at home delivers that iconic crunchy, tangy bar food experience with a crispy exterior and perfectly tender core. I spent years perfecting this recipe after realizing most versions miss the key texture—until I cracked the secret of double-dredging in seasoned flour and cornmeal.
The result? Bites that stay crispy even after frying, paired with a creamy ranch dip that cuts through the saltiness beautifully.
This recipe transforms simple dill pickles into restaurant-quality appetizers using just five key ingredients and a foolproof frying technique. The double-dredge method creates that signature crunch, while the tangy ranch dip—made with buttermilk and fresh herbs—elevates every bite.
No deep-frying skills required; even beginners can achieve perfect golden-brown pickles with this step-by-step approach.
What you’ll end up with is a plate of golden, crispy pickles with a tender center, served with a cool, creamy ranch that balances the saltiness. The texture contrast alone makes these irresistible—crunchy outside, juicy inside, and perfectly seasoned.
This is the kind of appetizer that disappears fast at parties or game day gatherings, but tastes just as good when you’re craving a salty, tangy snack solo.
The beauty of this recipe lies in its versatility—serve as an appetizer, snack, or even a side dish with burgers or sandwiches. Once you try homemade, you’ll never buy the frozen version again. Let’s get started on making these crispy, tangy bites that taste just like the steakhouse.
Ingredients for longhorn steakhouse fried pickles
Five core ingredients transform pickles into restaurant-style crunchy bites with a tangy ranch companion.
| Ingredient | Amount | Notes |
|---|---|---|
| Dill Pickles 🥒 | 1 lb | Whole, firm pickles preferred |
| All-Purpose Flour 🌾 | 1 ½ cups | White flour, sifted for lightness |
| Yellow Cornmeal 🌽 | ½ cup | Stone-ground for texture |
| Granulated Garlic Powder 🧄 | 2 tbsp | Freshly ground preferred |
| Diamond Crystal Kosher Salt 🧂 | 1 ½ tbsp | Fine grain for even coating |
| Ground Black Pepper 🌶️ | ½ tsp | Freshly cracked for flavor |
| Vegetable Oil 🫒 | 2 cups | High smoke point preferred |
| Buttermilk 🥛 | ½ cup | Full-fat for creaminess |
| Mayonnaise 🥫 | ½ cup | Duck or avocado preferred |
| Fresh Dill 🌿 | ¼ cup | Finely chopped, stems removed |
| Fresh Chives 🌱 | 2 tbsp | Thinly sliced for garnish |
| Lemon Juice 🍋 | 1 tbsp | Freshly squeezed |
| Unsalted Butter 🧈 | 2 tbsp | Cold, cubed for ranch |
The pickles are the foundation, so choose whole, firm dill pickles—those floppy ones won’t hold up during frying. Trader Joe’s and Whole Foods carry the best quality in the refrigerated section, but any jarred pickles in a brine (not vinegar) will work. For the double-dredge, sifted all-purpose flour creates the lightest crust, while stone-ground cornmeal from Bob’s Red Mill adds that signature crunch. The Diamond Crystal kosher salt is crucial here—its fine grain clings perfectly to the pickles without clumping. If you can’t find it, Morton kosher salt works, but reduce to 1 tbsp since it’s coarser.
No buttermilk? Substitute 0.5 cup plain yogurt plus 1 tbsp milk—the tang stays intact. For the ranch, avocado oil mayo adds richness, but any high-quality mayo will do. Fresh herbs make all the difference—dried dill at 1/4 the amount works in a pinch, but nothing beats the bright flavor of fresh. The lemon juice brightens the ranch, so don’t skip it. For the frying oil, vegetable or canola oil are standard, but grapeseed oil has a higher smoke point for extra safety. If you’re short on time, pre-shredded cornmeal from the baking aisle saves steps, though it lacks the texture of stone-ground.
Store the dry dredge mix (flour, cornmeal, seasonings) in an airtight container for up to 3 months—it’s perfect for coating other fried foods like onion rings. The ranch dip keeps for 4-5 days in the fridge, though it’s best within 2 days for maximum freshness. For the pickles, fry in small batches to maintain oil temperature—overcrowding steams them instead of frying. Serve immediately for peak crunch, but they’ll stay crispy for 10-15 minutes if kept warm in a 200°F oven on a wire rack.
Why You'll Love This Recipe
- No Chopping Needed: I swear by this—just slice the pickles straight from the jar, no peeling or dicing. The cornmeal crust clings perfectly to those spears, and honestly? The prep takes less time than waiting for takeout.
- Crunchy-Garlicky Magic: That diamond kosher salt and garlic powder combo? It’s like a flavor bomb. The crust gets crispy while the center stays juicy, and between us, it’s the kind of snack that disappears faster than my willpower on a lazy Sunday.
- Game Day Gold: I make these for every football season opener, tailgate, or even lazy movie nights. They’re the kind of dish that pairs with everything—burgers, wings, even just a cold beer. My friends always ask for the recipe, and now you can too.
- Budget-Friendly Crunch: Pickles are cheap, and this recipe stretches them into something fancy. I’ve fed a crowd of six for under $10, and the leftovers? They last in the fridge for days—just reheat in the oven until crispy again. (Yes, even on a Tuesday night.)
Step-by-step instructions for Longhorn steakhouse fried pickles
A perfect balance of crispy exterior and tangy interior—this method delivers restaurant-quality fried pickles every time.
Prepare the Pickles for Frying
Pat the 1 lb dill pickles completely dry with paper towels, removing any excess moisture from the surface. This step is critical—wet pickles won't crisp properly. Using a sharp knife, trim off the very top and bottom of each pickle to create a flat surface for even coating. Cut each pickle into ½-inch thick slices, working quickly to prevent the cut surfaces from releasing excess liquid.
In a medium bowl, whisk together the 1.5 cups all-purpose flour, 0.5 cup yellow cornmeal, 2 tbsp granulated garlic powder, 1.5 tbsp diamond crystal kosher salt, and 0.5 tsp ground black pepper. This dry mixture creates the crispy crust that defines these fried pickles. For best results, sift the flour and cornmeal together to eliminate any lumps that could prevent even coating.
Create the Tangy Ranch Dip
In a separate bowl, combine the 0.5 cup buttermilk, 0.5 cup mayonnaise, 0.25 cup finely chopped fresh dill, 2 tbsp thinly sliced fresh chives, 1 tbsp freshly squeezed lemon juice, and 2 tbsp cold cubed unsalted butter. Mix gently with a fork until the butter is fully incorporated and the dip reaches a smooth, creamy consistency. This dip should be thick enough to cling to the pickles but still spreadable—if it's too thick, add 1 tsp buttermilk to loosen.
Taste and adjust seasoning with additional salt or lemon juice as needed. The dip should have a bright, herby tang that complements the crispy pickles. Cover and refrigerate while you prepare the fried pickles, allowing the flavors to meld for at least 15 minutes before serving.
Fry the Pickles to Crispy Perfection
Heat 2 cups vegetable oil in a deep skillet or Dutch oven to 350°F—use a deep-fry thermometer to monitor the temperature precisely. Once the oil reaches temperature, working in batches to avoid overcrowding, dip each pickle slice into the flour mixture, pressing gently to adhere the coating evenly. Lift the coated pickles with a slotted spoon and carefully lower them into the hot oil.
Fry for 2-3 minutes per batch until the pickles are deep golden brown and the coating is uniformly crisp. Remove with tongs and drain on a wire rack or paper towel-lined plate to prevent sogginess. The key to success here is maintaining the oil temperature—if it drops below 325°F, the pickles will absorb too much oil and lose crispness. For best results, fry in two batches to ensure even cooking.
Serve Immediately with Ranch Dip
Transfer the fried pickles to a serving platter and immediately serve with the prepared ranch dip. The contrast between the crispy exterior and the tangy, slightly sweet interior of the pickles creates an irresistible texture profile. For an extra touch, sprinkle with additional fresh dill and chives just before serving to enhance the presentation and flavor.
These fried pickles are best enjoyed immediately while still crispy. If making ahead, fry just before serving and reheat in a 375°F oven for 5-7 minutes to restore crispness. Pair with a cold beer or your favorite steakhouse-style appetizers for the ultimate game-day snack or bar spread.
Pro Tips For Making Longhorn Steakhouse Fried Pickles
- PAT THE PICKLES DRY: Skip the soggy crust by blotting pickles with paper towels before dredging—wet spears will absorb flour like a sponge instead of forming that crispy cornmeal shell. I learned this the hard way when my first batch came out more mushy than crunchy.
- USE A THIN FLOUR LAYER: Shake off excess flour after the first dredge—you only need a light coating, not a thick armor. Too much flour steams instead of frying, and your pickles turn out dense. Think "dusting," not "powdering."
- FRY IN BATCHES: Overcrowding drops the oil temperature faster than a Texas summer storm, leading to greasy pickles instead of golden ones. Fry in small batches—3-4 pickles at a time—so they sizzle freely and develop that perfect crust.
- SEASON THE OIL: Toss in a pinch of Diamond Crystal kosher salt and garlic powder with the oil before frying—it infuses the fat and makes every bite taste like the real deal. (Yes, even if you’re serving it with ranch, it matters.)
Troubleshooting your longhorn steakhouse fried pickles
Oil Too Hot?
If your pickles brown too quickly but stay raw inside, your oil is too hot. The ideal temperature is 350°F—anything above 375°F burns the coating before the center cooks. I learned this the hard way when my first batch turned into crispy shells hiding raw pickle centers.
Use a deep-fry thermometer (I recommend ThermoWorks) to monitor temperature precisely. If you don’t have one, test with a small piece of bread—it should sizzle and turn golden in 30-45 seconds. 🌡️
Pickles Too Soft?
Soggy pickles usually mean excess moisture wasn’t removed properly. Pat them thoroughly dry before cutting and coating—don’t skip this step! Also, avoid overcrowding the fryer. I once fried an entire batch at once and ended up with sad, greasy pickles.
Fry in two batches maximum, giving each slice space to crisp without steaming. Another trick: Let pickles air-dry on a wire rack for 10 minutes after cutting before dredging.
Coating Won’t Stick?
This happens when the flour mixture isn’t fine enough or the pickles aren’t dry. Sift your flour and cornmeal together to eliminate lumps, then press the coating firmly onto each slice. I also recommend chilling the pickles for 30 minutes before frying—the cold surface helps the coating adhere better.
If the mix seems too dry, add 1 tbsp cold water to bind it slightly without making it sticky.
Ranch Too Thin?
Your dip might be watery if you used too much buttermilk or if the herbs weren’t chopped finely enough. For a thicker ranch, whisk in 1 tbsp cold butter at a time until it reaches a spreadable consistency.
I’ve also found that letting the dip sit for 20 minutes before serving helps it thicken naturally. If it’s still too runny, strain out excess liquid through a fine-mesh sieve before serving.
Reheating Problems?
Fried pickles lose crispness when reheated wrong. Never microwave them—they’ll turn rubbery. Instead, place on a wire rack in a 375°F oven for 5-7 minutes to restore crunch. For extra crispiness, broil for 1-2 minutes on high after oven heating.
The key is keeping them elevated so air circulates—never cover them while reheating. If you’re short on time, fry fresh batches in advance and store in the fridge for up to 2 days, reheating just before serving. 🔥
Seasoning Off?
Flat seasoning usually means the spices weren’t distributed evenly in the coating. I fix this by whisking the dry mix thoroughly before dredging and pressing the coating firmly onto each pickle slice.
For extra flavor, add ½ tsp smoked paprika to the dry mix—it adds a subtle depth that mimics Longhorn’s version. Taste the coating before frying to check seasoning, and adjust with additional salt or garlic powder as needed. Freshly ground spices always make a difference!
Nutrition facts
Frequently asked questions
Can I use frozen pickles instead of fresh?
but with one key adjustment: thaw and pat them extremely dry first. Frozen pickles often have excess moisture that prevents proper crispiness. For best results, let them air-dry on a wire rack for 15 minutes after thawing before cutting and coating. This extra step makes all the difference in texture.
How do I make this recipe gluten-free?
Replace the all-purpose flour with a 1:1 gluten-free flour blend (like Bob's Red Mill) and use cornstarch instead of cornmeal for the coating. Keep the same ratio—1.5 cups total—and ensure your cornmeal substitute is certified gluten-free. The texture will be slightly different but still delicious!
Can I bake these instead of frying?
Yes, but expect a different texture: bake at 425°F for 12-15 minutes on a wire rack (not a baking sheet) until golden. For extra crispiness, spray with oil before baking. The result will be lighter than fried, but still tasty—just not as crunchy. Air fryers work too at 375°F for 8-10 minutes.
What's the best way to store leftover fried pickles?
Store in an airtight container at room temperature for up to 2 days (they'll lose crispness after that). For longer storage, refrigerate for 3 days max. To revive, reheat in a 375°F oven for 5-7 minutes on a wire rack. Never freeze—they become soggy when thawed.
Can I make the ranch dip ahead of time?
Yes, but add the butter just before serving to maintain creaminess. Store the dip (without butter) in the fridge for up to 3 days**. Stir in cold butter cubes right before eating—they'll melt slightly, creating a perfect velvety texture. For extra freshness, add chopped herbs right before serving.